1.  Setting up git-flow
Git-flow
Like we discussed in the presentation, we’ll be using the git-flow branching model. Here’s what that looks like:
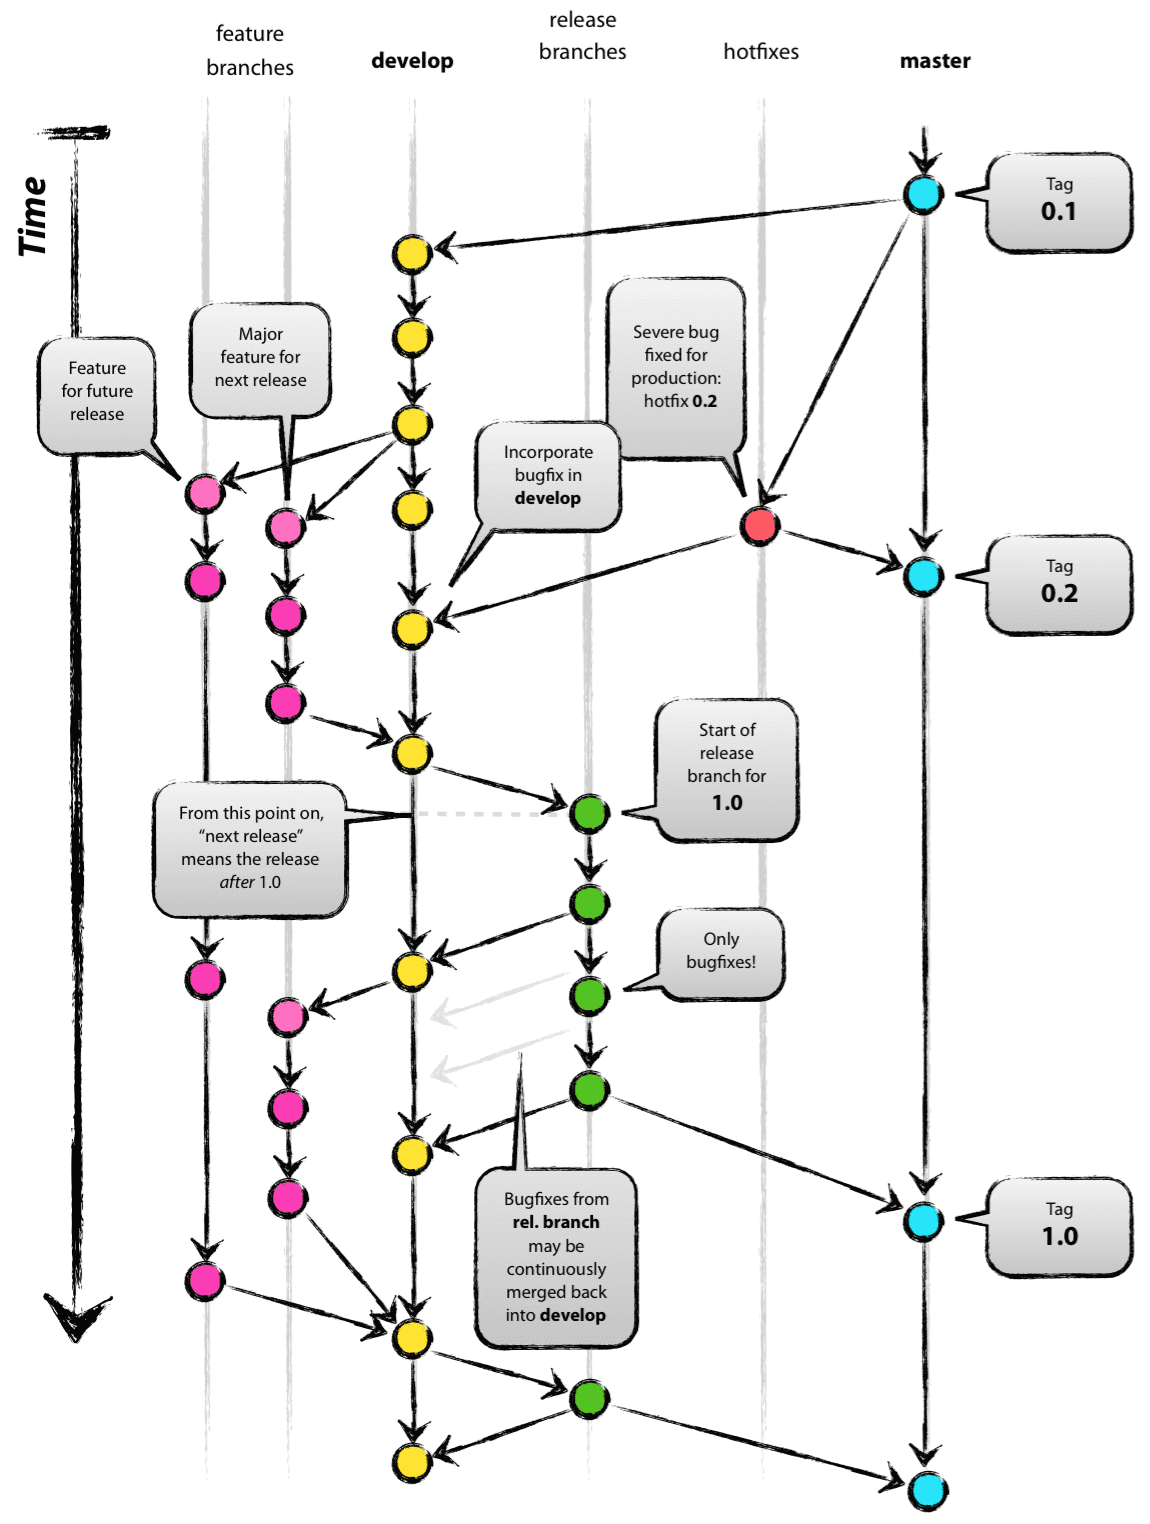
From: http://nvie.com/archives/323 (CC BY-SA 2.0)
Now, there’s a lot going on in this diagram so don’t panic if this still doesn’t make much sense to you - we’re going to be going through it in practice step-by-step.
Note
We use dev and main in this workshop, but devel, develop and master are also popular, especially with older repositories.
To summarise, the main important things to know about this flow are:
- The
mainbranch always represents the production ready, released version of the code. - All merges into the
mainbranch should be tagged with the version number, according to the Semantic Versioning (SemVer) standard. - The
devbranch represents the current tip of the development effort for your code. It should contain the latest updates in a working state (but if your dev branch is broken for a while, it’s not a big deal). - No work should be done directly on the
devormainbranches - instead, they should be branches out, completed and then merging back in (preferably after a pull request and peer review). - Features and non-urgent bug fixes should be branched from the
devbranch. - Urgent bug fixes (a.k.a. hotfixes) that need to be immediately updated on the production code should be branched from the
mainbranch, and merged into both themainanddevbranches when ready.
SemVer and git-flow
As we explained in the presentation, SemVer consists of 3 numbers, separated by full-stops, and an optional label at the end, like this:
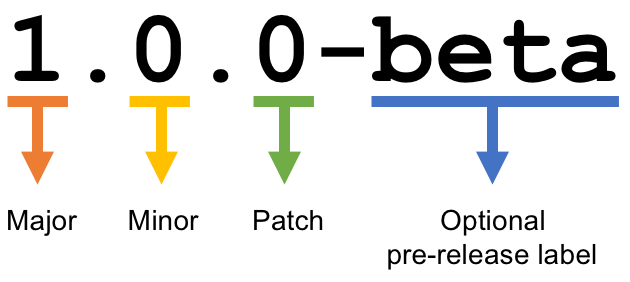
From: https://forums.ubports.com/topic/1822/semantic-versioning-for-ut (CC BY-SA 4.0)
There’s a few important things to understand about how SemVer works with git-flow. Let’s say we’re working on a library that tells you whether a particular day is a bank holiday or not. This imaginary library is currently on version 3.6.1.
- If I do a small bug fix, e.g. I’ve just merged my branch
bugfix/fix-holiday-on-weekend, I should update the version number to3.6.2. - If I do a significant feature, e.g. I’ve merged my branch
feature/support-chinese-holidays, I should update the version number to3.7.0. - If I make a backwards-incompatible change that will require users of my library to update their code to still work, e.g. I’ve merged my branch
feature/default-to-chinese-holidays, I should update the version number to4.0.0. It’s common to lump together breaking changes so that you’re reducing the number of major version updates - if you’re doing major version updates too regularly your project will be perceived as too unstable and people won’t want to use it.
Note
It’s commonly understood that if you’re in version 0.x.x, you’re in the rapid prototyping phase and so can have breaking changes without needing to bump up major version number.
When you release version 1.0.0, you’re essentially announcing to the world that you consider your project stable and that any future breaking changes will be both infrequent and accompanied by a major version update.
Aside - what makes a good commit?
Before we dive into our practical exercise, it’s worth first talking about what makes a particular git commit good, and what makes one bad.
It’s sometimes tempting to use commit messages like “updated /hello endpoint” or “Changes to backend”, but really these messages don’t convey a lot of information that’s really useful to someone trying to understand what’s going on in a repository.
Here are a few tips on creating the most useful commit messages you can:
- Be specific - If someone reads a commit that says “changes to backend”, the first thing we want to know is: what changes did you make! By being as specific as possible, it makes it massively easier to trace back through a commit history and find where a particular feature was added (or conversely where it was broken!). For an example of this, think about “Add date filtering to /hello endpoint”. Now someone who’s wondering why the date filtering isn’t working can look through the history and immediately pick out the commit that they need!
- Explain intent - We can see into the commit and look at what files you changed and how - the important thing to get across in your commit message is why you made the changes that you did. For instance, instead of saying “Changes to backend”, you could say “Increase backend timeout to prevent ephemeral issues”.
- Be consistent - It’s not particularly important which specific format you use for your commits. whether you choose to phrase your commits like “Add x to y” or “Added x to y” (although there are endless debates online) doesn’t really make any change anything about anything! As with the code itself, the important thing is to be consistent - choose an approach and stick to it (and make sure that other people stick to it as well).
-
When appropriate, include extra detail - There’s a standard format for git commits. They look like this:
Add date filtering to /hello endpoint.

Now you can pass in `start_date` or `end_date` as query parameters to the `/hello`
endpoint and the results will be filtering accordingly.
While the first line should be a brief summary of the changes, you can add additional info including a full description or any other salient points - simply add an empty line after the first one and put your description after that.
SSH into the VM
Before getting stuck into it, make sure you’ve SSHed into your assigned VM - it’s got all the tools you’ll need for this pre-installed so all you need to do is follow the instructions from Section 0 and you’ll be good to go.
The rest of this workshop assumes that you’re running these commands on the VM.
Forking & cloning the repo
We’re going to be working with GitLab CI/CD, which means we need to fork the repository into our own space.
If you don’t already have a GitLab account set up on gitlab.com, go ahead and head over to https://gitlab.com/users/sign_up and create your account.
Next, head over to https://gitlab.com/drewsilcock/go-with-the-flow-code and click on the “Fork” button.
Once we’ve forked the repo into our own account space, we can clone our forked repository from GitLab onto our local machine:
git clone https://gitlab.com/{my-username}/go-with-the-flow-code.git

# Then change into the directory that the cloned code is in.
cd go-with-the-flow-code
where {my-username} is your GitLab username.
Note
The workshop-completed branch contains the code with all the answers to the exercises - these are here in case you get really stuck and just need to see what’s going on, but it’s highly encouraged if you get stuck to either persist and figure it out or let us know and we can work through it together.
Seeing the answers is never as good a learning opportunity as figuring it out yourself!
Setting default merge behaviour
As we’re using git-flow, we don’t want to use the default git behaviour of “fast-forwarding” merges as this means there’s no history kept of our branches. We can modify our config to disable this behaviour:
git config --global merge.ff no
This won’t return anything indicating success, but you can check that it’s set correctly by running git config --global merge.ff, which should give you no.
Setting up our branches
We only have the workshop-start branch right now - not even a main branch! That’s the first thing we’ll need to create.
git checkout -b main
git push --set-upstream origin main
Great. Now that we’ve got a main branch and pushed it up to our GitLab repository, let’s tag out very first release:
git checkout main
git tag -a v1.0.0 -m "Release v1.0.0 - Initial app launch."
git push --tags
The important thing here is the name we’re giving our tag with the -a flag - v1.0.0. This is the SemVer version of our API that we’ll be developing. As we’re on version v1.0.0, we’ll be expected by our imaginary API customers to follow SemVer best practices for major, minor & patch version updates.
Code signing tags
In general, I would very much recommend creating a GPG key and signing your commits and tags using that key. You can then upload your public GPG key to GitLab to show whether your commits and tags are verified.
Having an expectation of signing your git activity is a really good position to be in from a security perspective.
If you do want to sign your tags, you simply replace the -a above with -s:
git tag -s v1.0.0 -m "Release v1.0.0 - Initial app launch."
While code signing is thoroughly recommended, setting up the relevant keys is outside the scope of this tutorial.
For more information, GitHub has plenty of info on GPG and git.
Next, let’s create our dev branch.
git checkout -b dev
git push --set-upstream origin dev
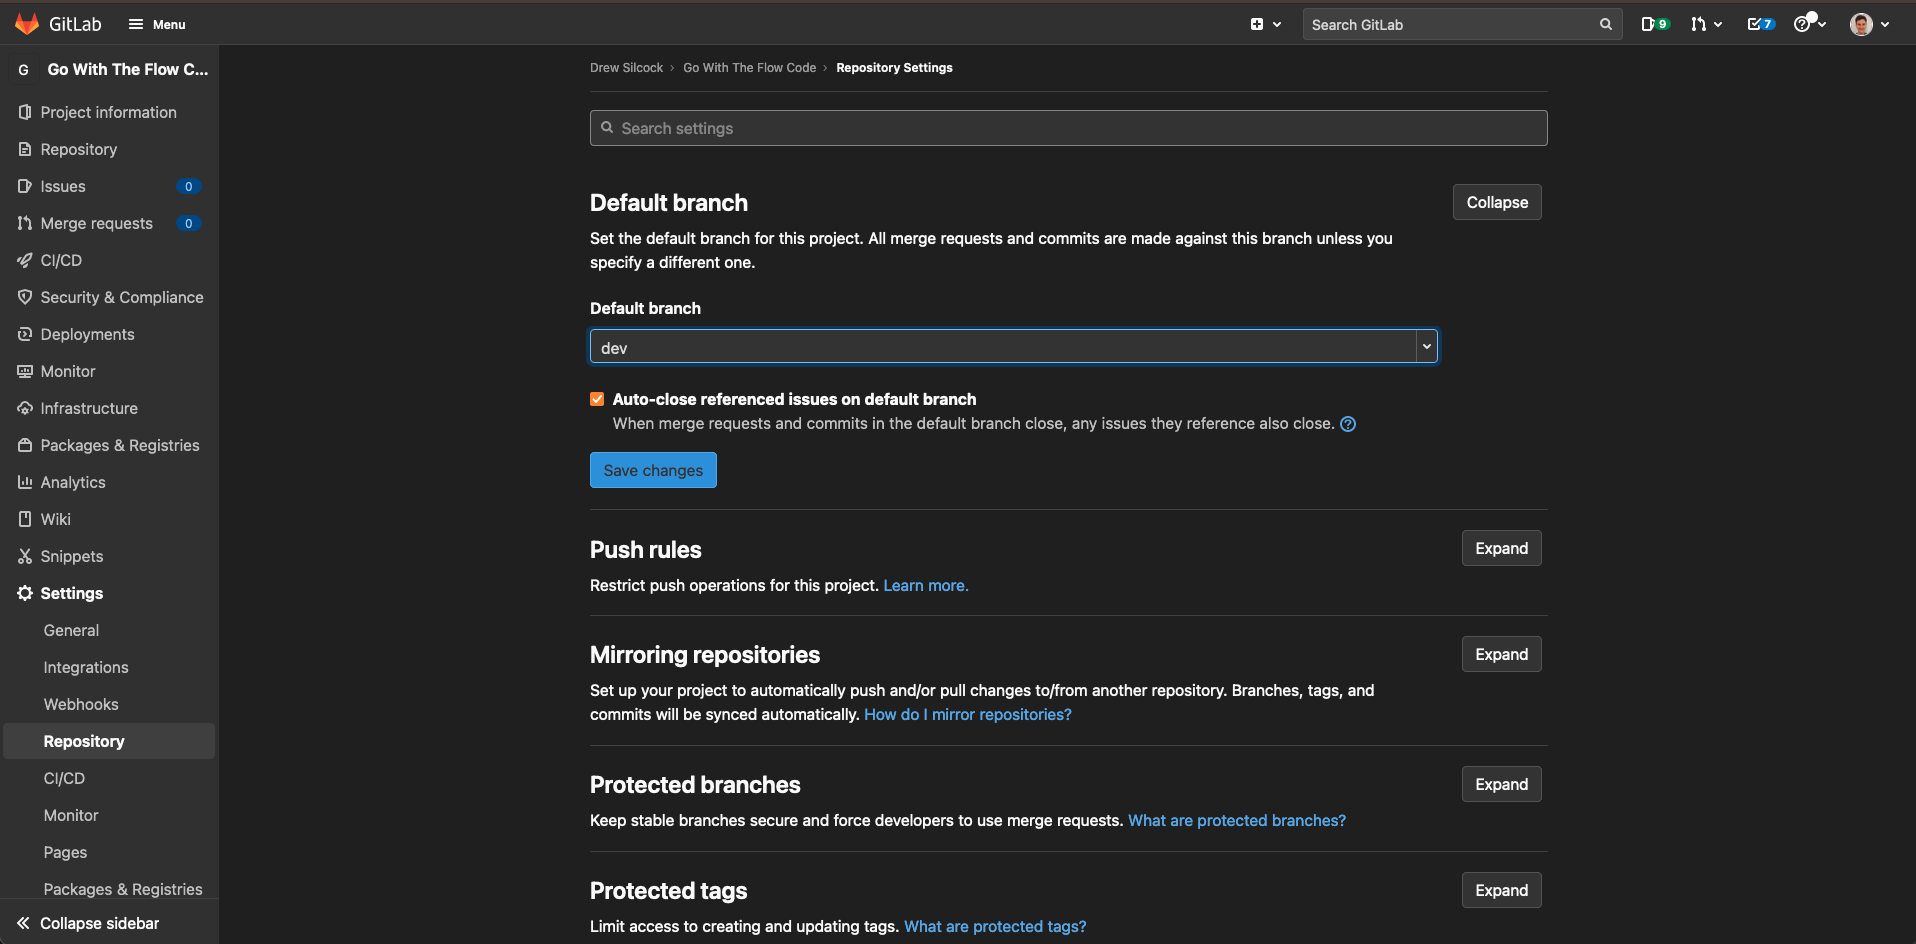
GitLab default branch
One last thing you’ll want to do before moving on - the GitLab repository itself has a default remote branch (the remotes/origin/HEAD we saw earlier) - you’ll want to change this to either dev or main.
I’d recommend putting dev as the default branch as it makes it the default target for merge requests, but making main your default branch is a perfectly reasonable choice too, as it represents the most up-to-date release of your project.
To do this, go to “Settings” > “Repository” > “Default Branch”:
Our sample API
Our sample API is a simple RESTful API called hbaas - you’ll find out what that stands for soon enough! We’re going to be adding a feature to the API, then setting up a CI/CD pipeline to deploy it to AWS.
Getting the API up and running and retrieving the API version
We want to be able to get the version of our app automatically, without needing to manually modify a file each time we want a new version.
Well there’s good news - we can get this out of git automatically!
If you’ve set up your git-flow and you’re on either your main or dev branches, we can get our current version in semver format by simply running:
git describe --tags --always
Info
To make sure that git describe always gives you the correct information on both master and dev branches, there’s a slight modification required to the git-flow. That is, once you’ve merged dev into the master branch (optionally via release branch) and tagged the release, you should merge back into the dev branch.
What this does is ensure that the tagged commit (i.e. the merge into main) is present on both main and dev, which ensures that git can accurately get the version from both branches.
Tip
Git will automatically add an extra bit to the version number based on how many commits ahead you are, which takes the place of the optional pre-release label.
For instance, if you were on version 0.6.3 but then made 2 commits on top, you would get out something like:
git describe --tags --always
> v0.6.3-2-g1a64609
Here the 2 indicates that we are 2 commits ahead of tag v0.6.3 and the g1a64609 is the shortened hash of the commit that we’re currently on.
Our hbaas API already has some clever linking implemented so we can check whether we’ve correctly set up our branching model using the app itself!
We’ve got a Taskfile.yml set up in our codebase so that we can use the Task task runner to build our API and do all the clever linking using git describe for us!
All we need to do is build the API executable using Task and make a request to the special /version endpoint:
task
./hbaas-server
If this works, you should see something like this:

Exercise 1.1
It’s time for our first exercise!
We want to query the API using curl to get the API version. Have a go at it!
Hint 1.1 - click to reveal
If you’re running the API in one terminal tab, you’ll need to get another tab up and SSH into the VM to run the curl command at the same time as the API command.
Alternatively, you can fork the API command using /hbaas-server &, but then you’ll need to remember to kill the server when you want to re-build the API, or the port will be in use and you won’t be able to run the API.
Answers 1.1 - click to reveal
To get the version, simply run:
curl localhost:8000/version
You should see something like this:

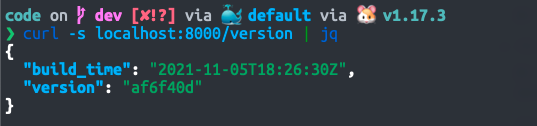
For bonus points, you can use the jq tool which is pre-installed on your VM to parse and colourise the JSON response:
curl -s localhost:8000/version | jq
This looks something like this:
Tip
If you are developing an API which is consumer-facing, you’ll need to implement some kind of versioning for the API itself so that updating from v1 to v2 doesn’t break all of your consumers’ applications.
There are 3 main ways to do this:
- Versioning using the URI, e.g. https://api.my-org.com/v1 and https://api.my-org.com/v2.
- Versioning using a custom HTTP header, e.g.
Accept-Version: v1andAccept-Version: v2. - Using the standard
Acceptheader, e.g.Accept: application/vnd.mycompany.myapp.myapi-v1+jsonandAccept: application/vnd.mycompany.myapp.myapi-v2+json.
Setting this up is outside the scope of this tutorial, but if this is something you need to think about, there’s plenty of resources online talking about it and arguing about which one is the One Right Way®.
Troubleshooting
If you see an error like this:
Building executable...
# golang.org/x/sys/unix
../../../go/pkg/mod/golang.org/x/sys@v0.0.0-20191228213918-04cbcbbfeed8/unix/syscall_darwin.1_13.go:25:3: //go:linkname must refer to declared function or variable
../../../go/pkg/mod/golang.org/x/sys@v0.0.0-20191228213918-04cbcbbfeed8/unix/zsyscall_darwin_arm64.1_13.go:27:3: //go:linkname must refer to declared function or variable
../../../go/pkg/mod/golang.org/x/sys@v0.0.0-20191228213918-04cbcbbfeed8/unix/zsyscall_darwin_arm64.1_13.go:40:3: //go:linkname must refer to declared function or variable
../../../go/pkg/mod/golang.org/x/sys@v0.0.0-20191228213918-04cbcbbfeed8/unix/zsyscall_darwin_arm64.go:28:3: //go:linkname must refer to declared function or variable
../../../go/pkg/mod/golang.org/x/sys@v0.0.0-20191228213918-04cbcbbfeed8/unix/zsyscall_darwin_arm64.go:43:3: //go:linkname must refer to declared function or variable
../../../go/pkg/mod/golang.org/x/sys@v0.0.0-20191228213918-04cbcbbfeed8/unix/zsyscall_darwin_arm64.go:59:3: //go:linkname must refer to declared function or variable
../../../go/pkg/mod/golang.org/x/sys@v0.0.0-20191228213918-04cbcbbfeed8/unix/zsyscall_darwin_arm64.go:75:3: //go:linkname must refer to declared function or variable
../../../go/pkg/mod/golang.org/x/sys@v0.0.0-20191228213918-04cbcbbfeed8/unix/zsyscall_darwin_arm64.go:90:3: //go:linkname must refer to declared function or variable
../../../go/pkg/mod/golang.org/x/sys@v0.0.0-20191228213918-04cbcbbfeed8/unix/zsyscall_darwin_arm64.go:105:3: //go:linkname must refer to declared function or variable
../../../go/pkg/mod/golang.org/x/sys@v0.0.0-20191228213918-04cbcbbfeed8/unix/zsyscall_darwin_arm64.go:121:3: //go:linkname must refer to declared function or variable
../../../go/pkg/mod/golang.org/x/sys@v0.0.0-20191228213918-04cbcbbfeed8/unix/zsyscall_darwin_arm64.go:121:3: too many errors
task: Failed to run task "default": task: Failed to run task "build": exit status 2
This means you’ve got an oudated version of the golang.org/x/sys package and so need to update it:
go get -u golang.org/x/sys
Once you’ve done this, your build should work.
Success
With this out the way, we’ve got our repo in a good starting state to use git-flow to complete our first feature!