3.  Containerise it
Our next step is going to be to take our API and containerise it - in other words, we’re going to build a Docker image to bundle up our server so that we can run it anywhere!
Recap - what are containers?
Before we start coding away, let’s first explain what containers are and how they work.
Info
If you already feel comfortable with what containers are and how they work, feel free to skip ahead to “Let’s get containerised!”.
Terminology
First of all, let’s get a bit of terminology out of the way:
Container image - a built self-contained bundle holding all the files, code & dependencies to run whatever it is you’re working on.
Container - a running instance of a container image. You can run as many container instances as you want from a single image, and once the container is running you can access a shell in that container and run whatever commands you want like any other command line1. This can be super useful for debugging any problems!
Container engine - The software that handles all the container-related tasks like building images, running containers, killing containers, etc.
Container registry - This is a server that acts as a library for storing and retrieving images. There are public ones like Docker Hub and Singularity Hub, but we’re gonna be spinning up and using our own private registry, because we don’t want to have our API images open to the public!
Tag - This is a label that you apply to an image. This is usually a version but it can be anything you want! There’s one special tag, though: latest. This is the default tag that’s used if you don’t specify a tag and should point to the latest, greatest version of your image. If you’re looking for most up-to-date version of any other application’s image, you can always look for that latest tag.
Base image - Container images work in layers so that images can be re-used as the basis for another image. This is called the “base” of your image. What this is really telling Docker (or other engine) is that your image is really just this base image, with a few bits added. Your output image will contain all the layers for your base image, but with an extra layer (or more) for the changes you’ve added on top. This layer re-use makes downloading derivative images much quicker and more efficient.
How does it work?
Containers are fundamentally a Linux technology! 2
In fact, containers are really a collection of features of the Linux kernel that enable you to namespace things like filesystems, processes, networks and memory. What this means is that a container can have its own processes that run completely isolated from the rest of your system, and this separation is enforced at the kernel level.
There’s no way that another container or process outside of the container runtime can access anything inside your image because the kernel enforces the isolation. This is a really simple concept (the specifics of the implementation are not so simple) but the power and versability that you can get out of this simple idea are pretty extraordinary!
As all the running containers on your machine share the same kernel, there’s much less runtime overhead for containers vs. virtual machines and the container images themselves can be just a few kilobytes instead of gigabytes. As a rule of thumb, there’s not generally any significant CPU overhead for running inside a container, but there is some overhead associated with the network stack. You can read some numbers for container performance characterisation here.
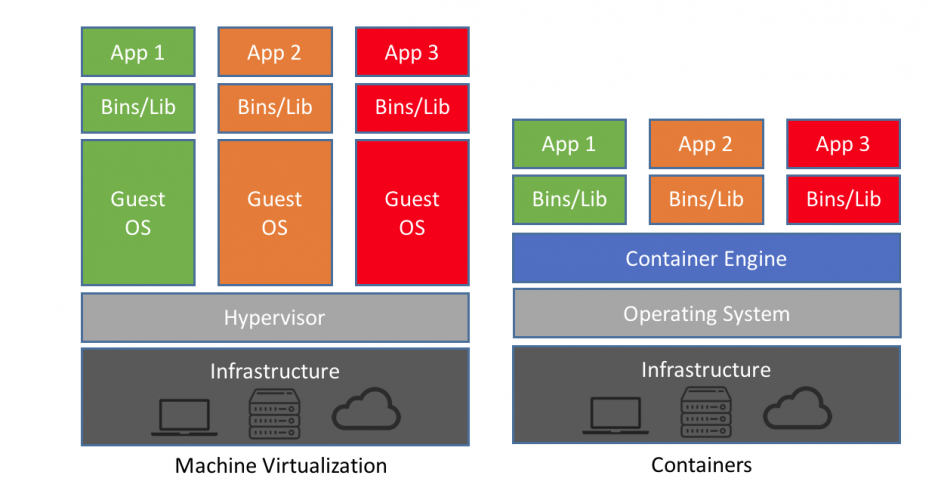
From: https://blog.netapp.com/blogs/containers-vs-vms/
If you want to get a deeper understanding of how containers work under the hood, I’d highly recommend the blog posts and zines by Julia Evans.
Container technologies
As far as container tooling goes, there’s a whale that dominates the market, but there are a few others that are slowly gaining ground.
Docker
This is the main player in the container world, by far - the metaphorical whale. (It’s also the one with the whale logo.) Docker was the company that popularised containerisation, which means the formats created by Docker had a massive impact on the container landscape.
While Docker Inc. is a private company, all of the code behind it is Open Source. They also spun out their core container runtime functionality into a separate component and donated it to the care of the Cloud Native Computing Foundation (ONCF), a part of the non-profit Linux Foundation.
In June 2015, Docker and other container companies established the Open Container Initiative - this organisation is also a Linux Foundation project and designs the specifications for the container runtime - runtime-spec and image format - image-spec.
While Docker is still the main tool, as all of the underlying technologies (containerd, runc) and specifications (OCI Image Spec, OCI Runtime Spec are open source, there are plenty of alternative tools that you can use.
Podman

Even though it dominates the market, Docker isn’t the only container runtime around with a logo of a happy cute sea animal!
Enter Podman.
The main differentiator between Docker and Podman is that Podman doesn’t need a daemon running as root in the background3. This makes it popular for security-conscious users or where root access to the underlying machine is not available (e.g. in HPC environments).
Singularity

Singularity is similar to Podman in arising out of a need for a rootless container runtime. Singularity also maintains full support for Docker images (they really are the de-facto standard).
The main difference is that Singularity is aimed at the scientific computing market - it’s specifically designed to work with and marketed towards HPC systems and allow for easily running containerised HPC workloads without any significant overhead and without needing any special privileges.
Rkt

Rkt is developed by CoreOS to be compatible with Docker images but with more of a focus on better security through customisable isolation. It’s mainly advertised as a container runtime replacement for large production-ready Kubernetes clusters. Recently, Red Hat acquired CoreOS and as a result development of Rkt stopped and the GitHub Repository was archived.
Let’s get containerised!
Our entrypoint into the world of containers is the Dockerfile. This file contains a series of steps that Docker will run in order to produce your image.
Note
I’m going to refer to Docker for the rest of this tutorial for brevity’s sake - just remember that it will also apply to other container engines. You could equally well use Podman to build your images from the same Dockerfile.
Let’s get started!
First things first, let’s create our feature branch:
git checkout dev
git checkout -b feature/containerise-api
Our API is written in Go, and there’s already a Docker image for building Go code! Let’s try it out. Go ahead and create a file called Dockerfile and fill it with the following:
Dockerfile
1 2 3 4 5 6 7 8 9 10 11 12 13 14 15 16 17 18 19 20 | |
These Dockerfiles are pretty simple - each line is a command to Docker that are run in the order that they’re written. You can find a full list of all the Dockerfile commands, along with the full explanations, at: https://docs.docker.com/engine/reference/builder/.
What this Dockerfile will do is take the Go Docker image from Docker Hub, copy all of our code into the image from the directory we’re in and build the app. It’s just missing one thing…
Exercise 3.1
We want to finish off this Dockerfile by specifying the command to run when the container starts. This exercise is to add that command.
You should use the Dockerfile reference to help you: https://docs.docker.com/engine/reference/builder/.
Hint 3.1 - click to reveal
The RUN instruction is used to run a command while building the image and the CMD instruction is used to specify the command that will be run when the image is run. Check out CMD in the Dockerfile reference for details on how the syntax works.
Answers 3.1 - click to reveal
Our built executable is simply called hbaas-server and the instruction to specify the runtime command of the image is CMD, so we want to add:
Dockerfile
1 2 3 4 5 6 7 8 9 10 11 12 13 14 15 16 17 18 19 20 | |
There is a subtle difference between CMD ["/app/hbaas-server"] and CMD /app/hbaas-server. The former is called the “exec” form and the latter is called the “shell” form. The exec form is the preferred form for a variety of reasons (see e.g. this article).
You could also use CMD ["./hbaas-server"] instead of specifying the full path to the executable, but it’s best practice to specify the full path because modifying our Dockerfile later on might involve changing the working directory which will cause the CMD command to fail.
We’re also going to add a .dockerignore file - this is exactly like a .gitignore but tells Docker that, even if we say COPY . ., we don’t need to worry about certain files. Let’s create one and put a few standards things in (this’ll speed up the image build time and often reduces the output image size too4):
.dockerignore
1 2 3 4 5 6 7 8 9 10 11 12 13 14 15 16 17 18 19 20 | |
As this has the same syntax as .gitignore, you can use the https://gitignore.io tool to generate your .dockerignore file based on the tools you’re using.
Now, let’s give it a build:
docker build --tag hbaas-server .
If all goes well, you should now be able to run your image:
# The `--rm` flag will clear up the container after it has run and the
# `--publish` flag enables us to connect to the container on port 8000
# using port 8000 on our host machine.
docker run --rm --publish 8000:8000 hbaas-server
You should now be able to query the API from your host machine, just like before!
curl -s localhost:8000/date/25-December | jq
Great! We’ve built, tagged and run our HBaaS Docker image!
Let’s commit our progress so far:
git add .
git commit -m "Added Dockerfile and .dockerignore to containerise API."
Info
This will have to download the relatively large golang:1.17 image from Docker Hub if you haven’t used it before.
If you have, Docker will use the cached layers. Docker layer caching is actually pretty neat! We’ll talk about it a bit more in a sec.
If you wanted to, you could take this image and run your service using it - it works! We’re not going to do that though, because we’re going to be a bit more clever about it.
Optimising our Docker cache usage
If you run the docker build command from above again, you’ll notice that instead of taking a few seconds, the image is generated almost instantly!
This is because after every single command that Docker runs, it does a bunch of clever stuff where it saves the image at that point in time in its cache and gives it an identifier.
If you change the Dockerfile or your code, Docker will be able to look through the previous images you’ve built and see whether it can re-use any of the “saved steps” and skip out actually running the commands.
If you leverage this in your Dockerfile, you can change Docker build times after a code change from minutes (and sometimes hours for very large images with lots of build steps!) into just a few seconds.
This might not seem too important for a small image like this, and it’s not, but as your Docker images get more complex and your Dockerfiles get longer, the cache will be more and more important.
So let’s look at making our Docker cache usage more efficient by updating our Dockerfile with the highlighted lines:
Dockerfile
1 2 3 4 5 6 7 8 9 10 11 12 13 14 15 16 17 18 19 20 21 22 23 24 25 26 27 | |
What this means is that we can download all of our dependencies before we do the important COPY . /app command. This way, is we change any of our source files and re-run the docker build command, our Docker build will skip straight past downloading the dependencies.
Tip
You can try this out by modifying one of the source files, like main.go and re-running the docker build command.
Now that we’ve optimised our cache usage, this seems like a good enough time for another commit:
git add .
git commit -m "Improve Docker cache utilisation."
Using a multi-stage Dockerfile
If we take a look at the image that we’ve generated using this Dockerfile, we can see that it’s pretty big:
docker images
REPOSITORY      TAG              IMAGE ID       CREATED          SIZE
hbaas-server    latest           f10019b6a215   6 minutes ago    1.19GB
Considering all we need at the end is our 11 MB hbaas-server executable, 1.19 GB seems pretty hefty! Don’t fret though, we can take advantage of Docker’s multi-stage builds to trim that output image size right down.
We’ll need to make some changes to our Dockerfile:
Dockerfile
1 2 3 4 5 6 7 8 9 10 11 12 13 14 15 16 17 18 19 20 21 22 23 24 25 26 27 28 29 30 31 32 33 34 35 36 37 38 39 | |
Now if we rebuild our image and check our sizes now with our fancy new multi-stage build, we can see a significant improvement:
docker build -t hbaas-server .
docker images
REPOSITORY         TAG                 IMAGE ID       CREATED          SIZE
hbaas-server       latest              edbb955e4319   41 seconds ago   21.8MB
Note
We’re using the Alpine image here which is basically a super-lightweight Linux distro which is really popular for making Docker images because of its tiny size. We can see here that it’s adding around 10 MB on top of our executable. Not bad!
In fact, technically we don’t even need Alpine! We could equally have done FROM scratch instead which would contain literally no other files! The only reason we’re not doing this is that cloud providers often require basic utilities like Bash installed to work properly, and we need to install the ca-certificates package in order for our API to support TLS (i.e. to be able to access our API using https:// instead of http://).
Now that we’ve got a working multi-stage Dockerfile, let’s save our progress with another commit:
git add .
git commit -m "Refactor Dockerfile into multi-stage build process."
Tagging the image with the version
If you remember back to Section 1, we used git describe to automatically get the version in SemVer format from our git-flow.
We can use this same tactic to automatically tag our Docker images with their version!
There are two ways of doing this:
- Remove
.gitfrom the.dockerignoreso that all our git files are included in the builder Docker image. This allows us to get the version from within the builder image, but increases the build image size and will mean that our cache gets invalidated whenever anything in the.gitfolder changes, which is pretty often! - Pass the version into the
Dockerfileusing theARGinstruction.
Let’s try implementing the latter option - we’ve already got a Taskfile.yml that specifies our commonly-used tasks for exactly things like this, so let’s add it to that.
First things first, we need to update our Dockerfile so that it understands that we want to pass the version in as a build-time argument:
Dockerfile
4 5 6 7 8 9 10 11 12 13 | |
Next let’s take our Taskfile.yml file which defines our tasks and add another task to it:
Taskfile.yml
44 45 46 47 48 49 50 51 52 53 54 55 56 57 58 59 60 61 62 63 64 65 66 67 68 69 70 71 | |
The Taskfile.yml will take {{.VERSION}} from the $VERSION environment variable if it exists, and default to git describe --tags --all if it doesn’t. This means we can pass the version through from the Taskfile.yml task build-image back into the Taskfile.yml task build-linux via the Dockerfile.
Let’s commit our progress again before moving on:
git add .
git commit -m "Add task to `Taskfile.yml` to build Docker image with version."
Let’s create our private repository
Next we’re going to upload our images to a private repository in AWS - this will allow us to run our API from the image hosted in our private repository. This will allow us to deploy our API to AWS cloud services using the image from our private registry.
This assumes that you’ve logged into the CLI as per the instructions in Section 0 - make sure you’ve done this before proceeding.
Now, let’s create our private repository:
# This has to be unique within our workshop, so just use your name or something specific
# to you. It should only have alphanumeric characters and hyphens in.
export me="<replace this with your name>"
aws ecr create-repository --repository-name go-with-the-flow/hbaas-server-$me
You should then be able to see your repository when you run aws ecr describe-repositories:
{
  "repositories": [
    {
      "repositoryArn": "arn:aws:ecr:eu-west-2:049839538904:repository/go-with-the-flow/hbaas-first-last",
      "registryId": "049839538904",
      "repositoryName": "go-with-the-flow/hbaas-first-last",
      "repositoryUri": "049839538904.dkr.ecr.eu-west-2.amazonaws.com/go-with-the-flow/hbaas-first-last",
      "createdAt": "2021-11-05T16:58:08+00:00",
      "imageTagMutability": "MUTABLE",
      "imageScanningConfiguration": {
        "scanOnPush": false
      },
      "encryptionConfiguration": {
        "encryptionType": "AES256"
      }
    }
  ]
}
Tip
If you aren’t able to run these commands on the container registry, your AWS account might not have the necessary permissions to interact with ECR.
If that’s the case, get in contact ASAP so that we can give you the permissions you need!
If you can see your repository in the output of that final command then congratulations, you’ve created your container registry repository!
Time to upload our image
Now we’re going to upload our image into the registry. We’re going to use the Taskfile.yml so that we can re-use our existing tooling.
Firstly, we need to add a few variables at the beginning of the file:
Taskfile.yml
1 2 3 4 5 6 7 8 9 10 11 12 13 14 15 16 17 18 19 20 21 22 23 24 25 26 27 28 29 30 31 32 33 | |
Where you replace <your-name> with the personal identifier (e.g. name with hyphens instead of spaces) from the previous section.
Next, we want to add a task called upload-image to our Taskfile.yml.
Exercise 3.2
Complete this task to upload the image to our AWS container registry:
Taskfile.yml
58 59 60 61 62 63 64 65 66 67 68 69 70 71 72 73 74 75 76 77 78 79 80 81 82 83 84 85 86 87 88 89 | |
You can access the relevant variables using the {{.VARIABLE_NAME}} syntax. For instance:
- Full URI to container image:
{{.CONTAINER_URI}} - Current version:
{{.VERSION}} - Current branch:
{{.GIT_BRANCH}}
You might need to refer back to the build-image task we added before to make sure you know what the image tags are.
Hint 3.2 - click to reveal
There are two parts to this task:
- Tagging the images with the full URI of the container image, including the container registry, namespace, repository and tag.
- Pushing the images up with Docker.
For the former, you’ll need to add an extra tag to the image generated from the build-image task. For the latter, you just need to use docker push to upload the image to the repository.
Answers 3.2 - click to reveal
There are four commands required to complete this task:
Taskfile.yml
69 70 71 72 73 74 75 76 77 78 79 80 81 82 83 84 85 86 87 | |
The first three tag the images with the full URI of the container image including tag. This tells Docker that it is this image that should be uploaded when we run the final two commands.
You’ll notice the branch tagging and pushing have a weird bit of bash at the beginning - we might not always be on a branch, so this simply checks whether GIT_BRANCH is empty - if it is, it doesn’t try to tag and push the branch image. Don’t worry too much if you didn’t include this in your solution, it’s just to prevent errors in case you’re running e.g. on a tag instead of a branch.
Now, one thing we haven’t sorted out yet is the authentication with the private ECR repository. There’s a tool made by Amazon called amazon-ecr-credential-helper that conveniently handles all this for us by reading ~/.aws/credentials, where the AWS CLi stores its configuration, but we need to install it first:
sudo apt update
sudo apt install amazon-ecr-credential-helper
Now we need to tell Docker that we’re using this credential helper by creating the directory ~/.docker (e.g. using mkdir -p ~/.docker) and adding a file called ~/.docker/config.json with the following contents:
~/.docker/config.json
1 2 3 | |
Let’s commit our progress again:
git add .
git commit -m "Add task to upload image to AWS ECR."

# Let's save our progress now.
git push --set-upstream origin feature/containerise-api
Now you can merge the feature branch into dev either using git locally or on GitLab - just remember to disable fast-forwarding if you do it in GitLab.
Once you’ve done that, go ahead and run our image upload task:
git checkout dev
git pull --rebase
task upload-image
If all goes well, you should now be able to see your images in the AWS ECR repository:
aws ecr describe-images --repository-name go-with-the-flow/hbaas-server-<your-name> | jq
{
    "imageDetails": [
        {
            "registryId": "049839538904",
            "repositoryName": "go-with-the-flow/hbaas-server-<your-name>",
            "imageDigest": "sha256:c29a539f33ac40ac65a053d75c1f6ae6e75440c14c4f8e2a0d231f612b1b5166",
            "imageTags": [
                "latest",
                "v1.0.0-af6f40d"
            ],
            "imageSizeInBytes": 12110280,
            "imagePushedAt": "2021-11-07T20:32:42+00:00",
            "imageManifestMediaType": "application/vnd.docker.distribution.manifest.v2+json",
            "artifactMediaType": "application/vnd.docker.container.image.v1+json"
        }
    ]
}
Success
Great work! Now you’ve containerised your API.
Now you’re ready to start automating tasks using continuous integration.
-
This assumes that the image you’re working with has a shell installed - if you have an image using the scratch image, you won’t have anything like this. It’s precisely for this reason that using this image isn’t recommended unless you specifically need very very small Docker images. ↩
-
In fact, if you’re running Docker on either macOS or Windows, you’ll be running a Linux virtual machine under the hood - all of the container cleverness happens inside the virtual machine’s Linux kernel. ↩
-
The Docker daemon can now run in rootless mode, but this is very early stage and still has some big limitations. ↩
-
In this particular case, we’ll be using a builder image separate from the output image at the end, so it won’t have an image on the final image size. In general though, the more you can ignore with the
.dockerignore, the better! ↩