4.  Setting up continuous integration
Next, we’re going to leverage the power of continuous integration to take a bunch of work off our hands and generally make our lives easier.
Recap: what’s continuous integration all about?
In short, continuous integration (or CI) just means setting up a computer to run automatic checks over your code every time you upload a commit to your repository.
This is a super simple idea but can bring a lot of power and versatility to your project workflow. Not only will CI check common mistakes and typos for you, it can provide a history of builds and documentation so that you can track down any bugs you find to the exact commit that caused them.
Continuous integration solutions
There are a bunch of different CI tools out there. Here’s a quick overview of the most popular:
GitLab CI/CD
GitLab CI/CD is what we’re going to be using for this demo for a few reasons:
- GitLab is an incredibly popular tool for companies hosting their own version control system. This makes it prevalant in business which don’t want their IP-sensitive company code on a publicly hosted systems.
- GitLab CI/CD comes built into GitLab - all you need to do to set up a Runner (i.e. computer which runs our pipelines) is run a simple script.
- GitLab CI/CD is free to use on the publicly hosted gitlab.com GitLab instance and works out of the box without needing to install, setup or enable anything whatsoever. This means that it’s both free and easy to use for this tutorial.
Overall, GitLab CI/CD is a very sophisticated, well designed and battle-hardened CI solution.
GitHub Actions
GitHub Actions is the new kid on the block here - it started its public beta not too long ago but has since become a popular CI solution, particularly since TravisCI changed their pricing model.
It’s being used in production by big companies already, and if you’re developing on GitHub, it’d be my primary recommendation for a CI solution, even if it’s still not as well established as the big players like GitLab CI, CircleCI and TravisCI.
One of the big advantages of GitHub Actions is that because it’s built into GitHub, you can fork a repository and have the CI just work on your fork (excluding any secret variables). This is actually pretty powerful! This same advantage also applied to GitLab, but GitHub remains the go-to solution for open source code and many proprietary codebases.
Something that sets GitHub Actions apart from all the competitors is it’s support for code annotations that will label issues with your code directly in the pull request, which is a pretty useful feature.
This and the ability to leverage pipelines other people have written (via the GitHub Marketplace) to made your CI configuration easier means that Actions will likely be used more and more over the next few years, especially for open source projects.
All the skills you learn from using GitLab CI/CD here should equally well transfer over to GitHub Actions - they’re both YAML-based CI solutions, the main difference is just that in GitLab CI/CD you use Docker images to run your CI, whereas on GitHub Actions you get a more barebones environment and are responsible for things like checking out the code and installing anything you need yourself (although there’s usually an existing Action on the GitHub Marketplace you can utilise).
Jenkins

Jenkins is, like DroneCI, designed to be hosted by the consumer themselves. Compared to all the others, it is the ancient behemonth, hardened by years of heavy use.
It’s a large, lumbering project which predates many things like containers and infrastructure-as-code.
For this reason, it’s largely lagged behind in terms of functionality, but makes up for it by having an enormous ecosystem of plugins. Because Jenkins has been around for so long and has been used by so many people, there’s a plugin for pretty much anything you might want to do.
This does mean that it doesn’t provide out-of-the-box support for many things, and in my experience it’s a lot more effort to maintain and configure, but it’s certainly stable product with many years of battle experience under its belt.
TravisCI

TravisCI was one of the first CI solutions out there. It used to be the market leader by a long way, and you’d find almost all open source projects using TravisCI, as well as lot’s of proprietary projects.
It’s certainly well used, well loved and well established, but it doesn’t have the dominance that it once did. More and more GitHub projects are moving over to GitHub Actions or CircleCI instead of TravisCI, but it still remains a solid option!
CircleCI

CircleCI is similar to TravisCI is many ways, with two important differences:
- While there’s a fully hosted version, you can always run your own CircleCI server
- CircleCI has a free plan available to closed-source projects
Other than that, there’s not much more to say! The configuration is slightly different to TravisCI (but still YAML) and it doesn’t have the same build matrix options that TravisCI has.
Regardless, CircleCI remains a very popular choice for its relative cheapness, easy of use and ability to move onto self-hosted servers now or at a later date without any frictions or conversion required.
DroneCI

DroneCI is a another new kid on the block. It’s a self-hosted solution designed to be container-native from the offset - everything runs in containers, from the jobs to the DroneCI server to the job runners.
Like almost all the others (looking at you Jenkins), it uses a simple YAML format for the configuration. There’s a tool to convert GitLab CI configs into DroneCI configs (although in my experience the conversion misses out many of the features of the original).
DroneCI is a very simple and slick solution that’s good if you want to be able to quickly set up a CI server and forget about it from then on. There’s basically zero required (or even possible) system configuration, which makes it excellent for simple tasks, but lacking flexibility for complex custom workflows. Then again, there’s always an API for you to use if you want to build out your own custom CI code around the DroneCI API…
Important - new GitLab users need to read this
On May 17th 2021, GitLab changed their policy on usage of shared runners to prevent misuse. A GitLab “Runner” is the machine that runs your CI/CD pipelines for you.
What this means is that if you created your GitLab account since then, you’ll need to either:
- Add a credit or debit card to your account (it won’t be charged anything and can be removed after the workshop)
- Disable shared runners on your account and register your own runner own your AWS VM.
If you created your GitLab account before May 17th or you’re willing to add a card to your account, you’re in the clear and can move onto the next section. If not, here are some instructions to follow to workaround this:
Disabling shared runners
Firstly, you’ll need to go to your project in GitLab and click on “Settings” > “CI/CD” on the left bar. Uncheck the switch called “Enable shared runners for this project”, like so:
Registering your own runner
Next, we’ll install and register our GitLab runner on our AWS VM.
To do this, simply run:
curl -LJO "https://gitlab-runner-downloads.s3.amazonaws.com/latest/deb/gitlab-runner_amd64.deb"
sudo dpkg -i gitlab-runner_amd64.deb

# Check that gitlab-runner is indeed running.
sudo gitlab-runner status
You should see something like:
Runtime platform                                    arch=amd64 os=linux pid=5530 revision=4b9e985a version=14.4.0
gitlab-runner: Service is running
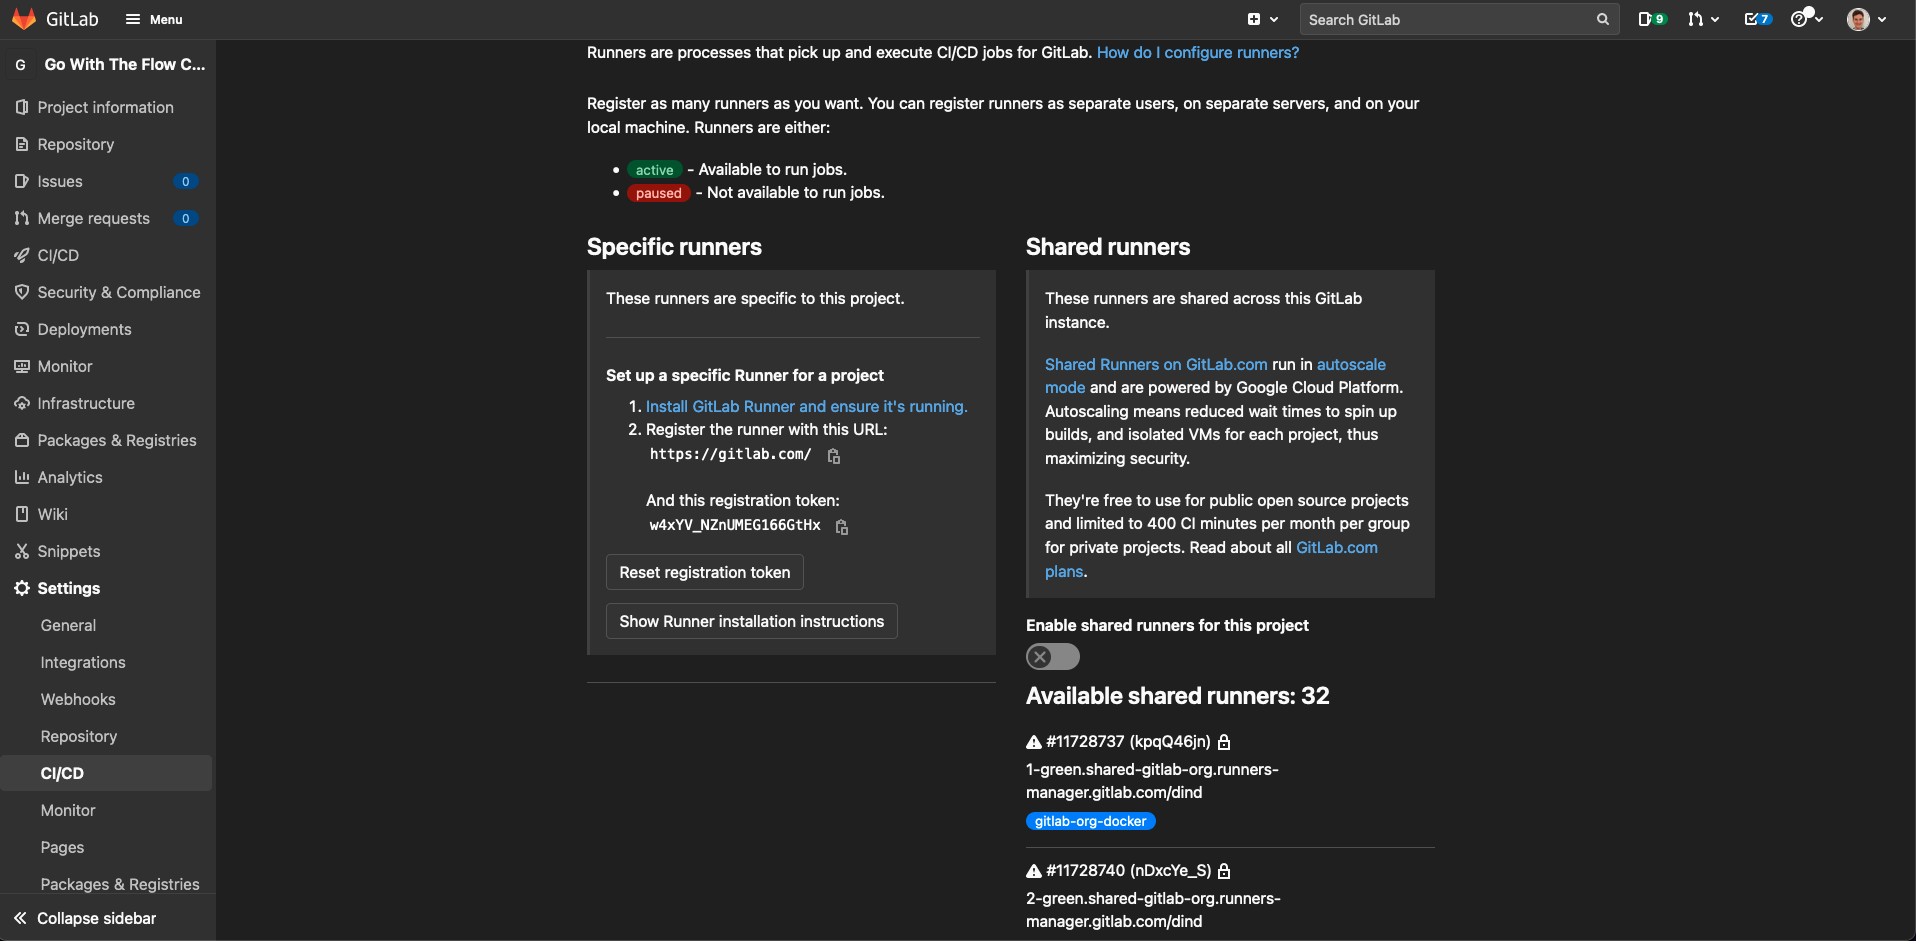
Now our runner is up and running, we need to register it with our repository. To do this, go back to the “Settings” > “CI/CD” page and go to “Runners” - make a note of the registration token under “Specific runners”.
Info
“Specific runner” is just what GitLab calls a runner set up for a specific project, instead of the shared runners which are generally available for GitLab users and the group runners which are available for all projects under a group.
From the screenshot above, you can see that the registration token is w4xYV_NZnUMEG166GtHx.
Warning
You shouldn’t share this registration token with anyone else as it gives others the ability to access your project’s CI/CD pipeline, including access your code. Don’t worry, I reset my token after taking the screenshot 
It’s a simple command to register the runner:
export token="<your GitLab runner registration token>"

sudo gitlab-runner register \
  --non-interactive \
  --url="https://gitlab.com" \
  --registration-token="$token" \
  --name="aws-vm" \
  --tag-list="docker" \
  --run-untagged="true" \
  --docker-privileged \
  --docker-volumes="/cache" \
  --docker-volumes="/certs/client" \
  --executor="docker" \
  --docker-image="docker:19.03.12"
You can check whether that’s worked by running:
sudo gitlab-runner verify
sudo gitlab-runner list
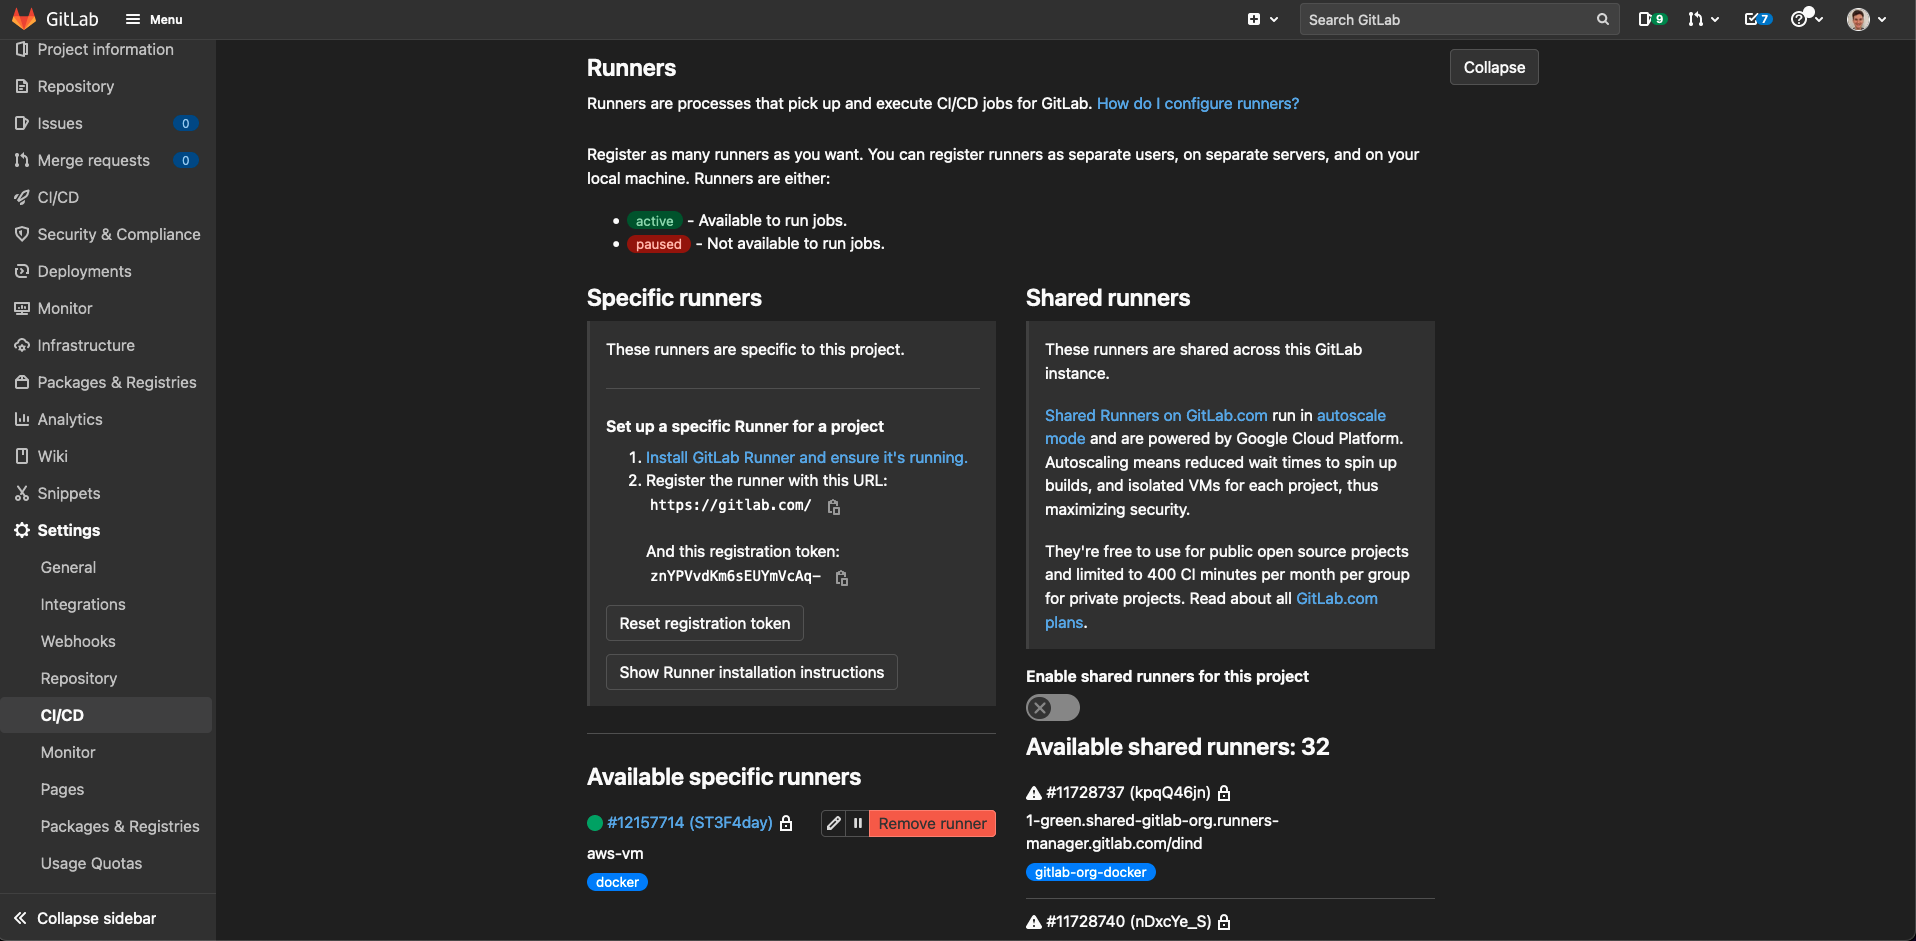
You should see your newly registered runner listed in the output here and also on the GitLab CI/CD page under “Runners”, underneath where we got the registration token from earlier. Hopefully, it’ll even have a nice green circle next to it, like this:
Hooray! You should now be ready to continue onto the next section.
Info
If you do encounter an issue when running a pipeline where GitLab says the pipeline is “stalled”, it means that for whatever reason GitLab can’t or doesn’t want to run your pipeline on your registered runner. If this happens, go ahead and let us know and we’ll figure out what’s going wrong. (It’s usually just a simple configuration error.)
Time to clear out the lint
The first thing we’re going to want to do in our continuous integration is lint our code. This means automatically checking to make sure it is correctly formatted and doesn’t fall victim to common programming mistakes.
In Go, the most popular tool for CI linting is golangci-lint - this combines a bunch of different checkers into one single tool which is easy to install in CI pipelines. It’ll check for common programming mistakes, style inconsistencies and it’ll verify whether we’ve remember to run go fmt to automatically format our code.
Let’s add another task to our trusty Taskfile.yml to lint and auto-format our code.
Taskfile.yml
76 77 78 79 80 81 82 83 84 85 86 87 88 89 90 91 92 93 94 95 96 97 98 99 100 101 102 103 104 105 106 107 | |
Before running it, we need to quickly install the golangci-lint tool:
curl -sSfL https://raw.githubusercontent.com/golangci/golangci-lint/master/install.sh | sh -s -- -b /usr/local/bin v1.43.0
We can then run task lint to check for style and formatting errors. Give it a try now!
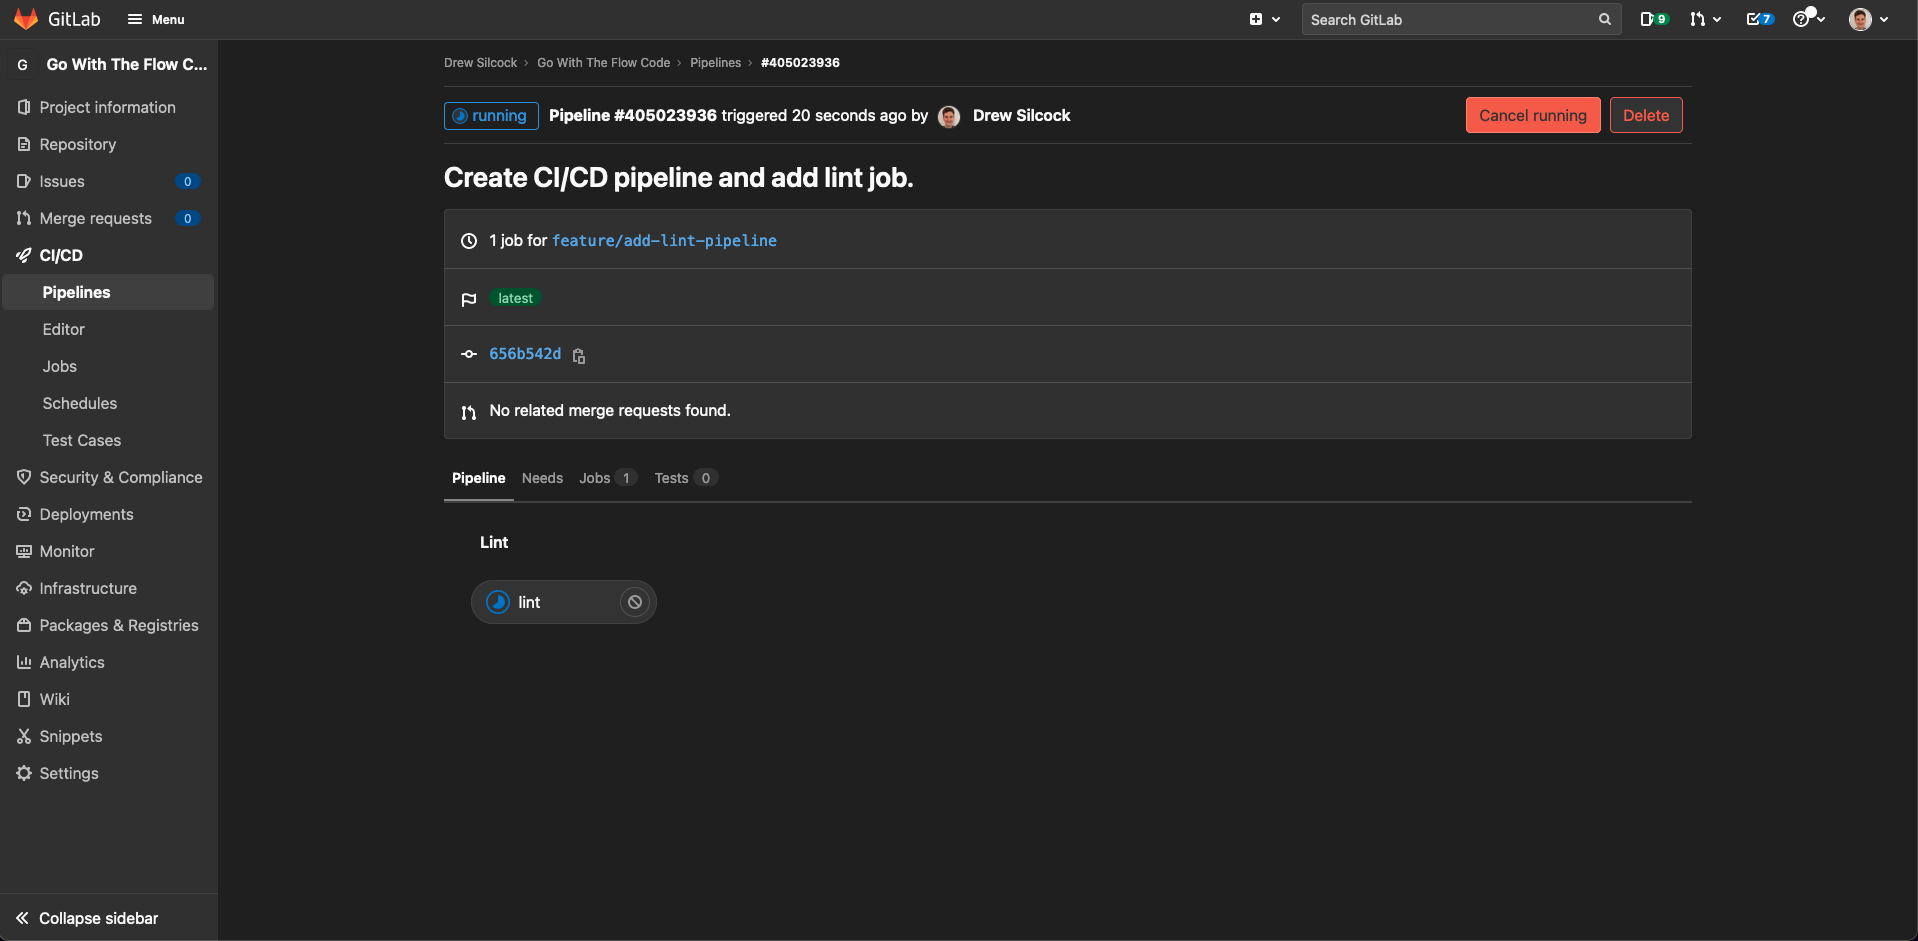
Next, we’re going to create a GitLab CI/CD pipeline that runs this lint task. Every time we push a new commit up to our GitLab repository, it’ll run this linter and tell us if we’ve made a mistake.
GitLab CI/CD (much like most of the other CI solutions) uses YAML configuration files to define the pipelines. Let’s add a file called .gitlab-ci.yml to our repository with our linting pipeline:
.gitlab-ci.yml
1 2 3 4 5 6 7 8 9 10 11 12 13 14 15 16 17 18 19 20 21 22 23 24 | |
Tip
Notice how we’re specifying a GOPATH in the lint job before_script and caching that folder with the cache section - this ensures that the Go dependencies are all cached in between each CI run, which will massively speed up how long it takes to complete your CI pipelines.
Let’s commit this change and push it up to our repository.
# Make sure we're on the up to date dev branch.
git checkout dev
git pull --rebase
git checkout -b feature/add-lint-pipeline

git add .
git commit -m "Add GitLab CI pipeline to lint code using golangci-lint."
git push --set-upstream origin feature/add-lint-pipeline
If you go to “CI/CD” > “Pipelines” in your GitLab project, you should now see your pipeline running for the first time.
Once that’s passed let’s merge that feature branch into dev and move on.
Let’s make sure our code builds
Now that we’ve got a basic CI pipeline set up to lint our code, we’ve already got a pretty big safety net to prevent uncaught mistakes getting into our codebase.
But we can do better.
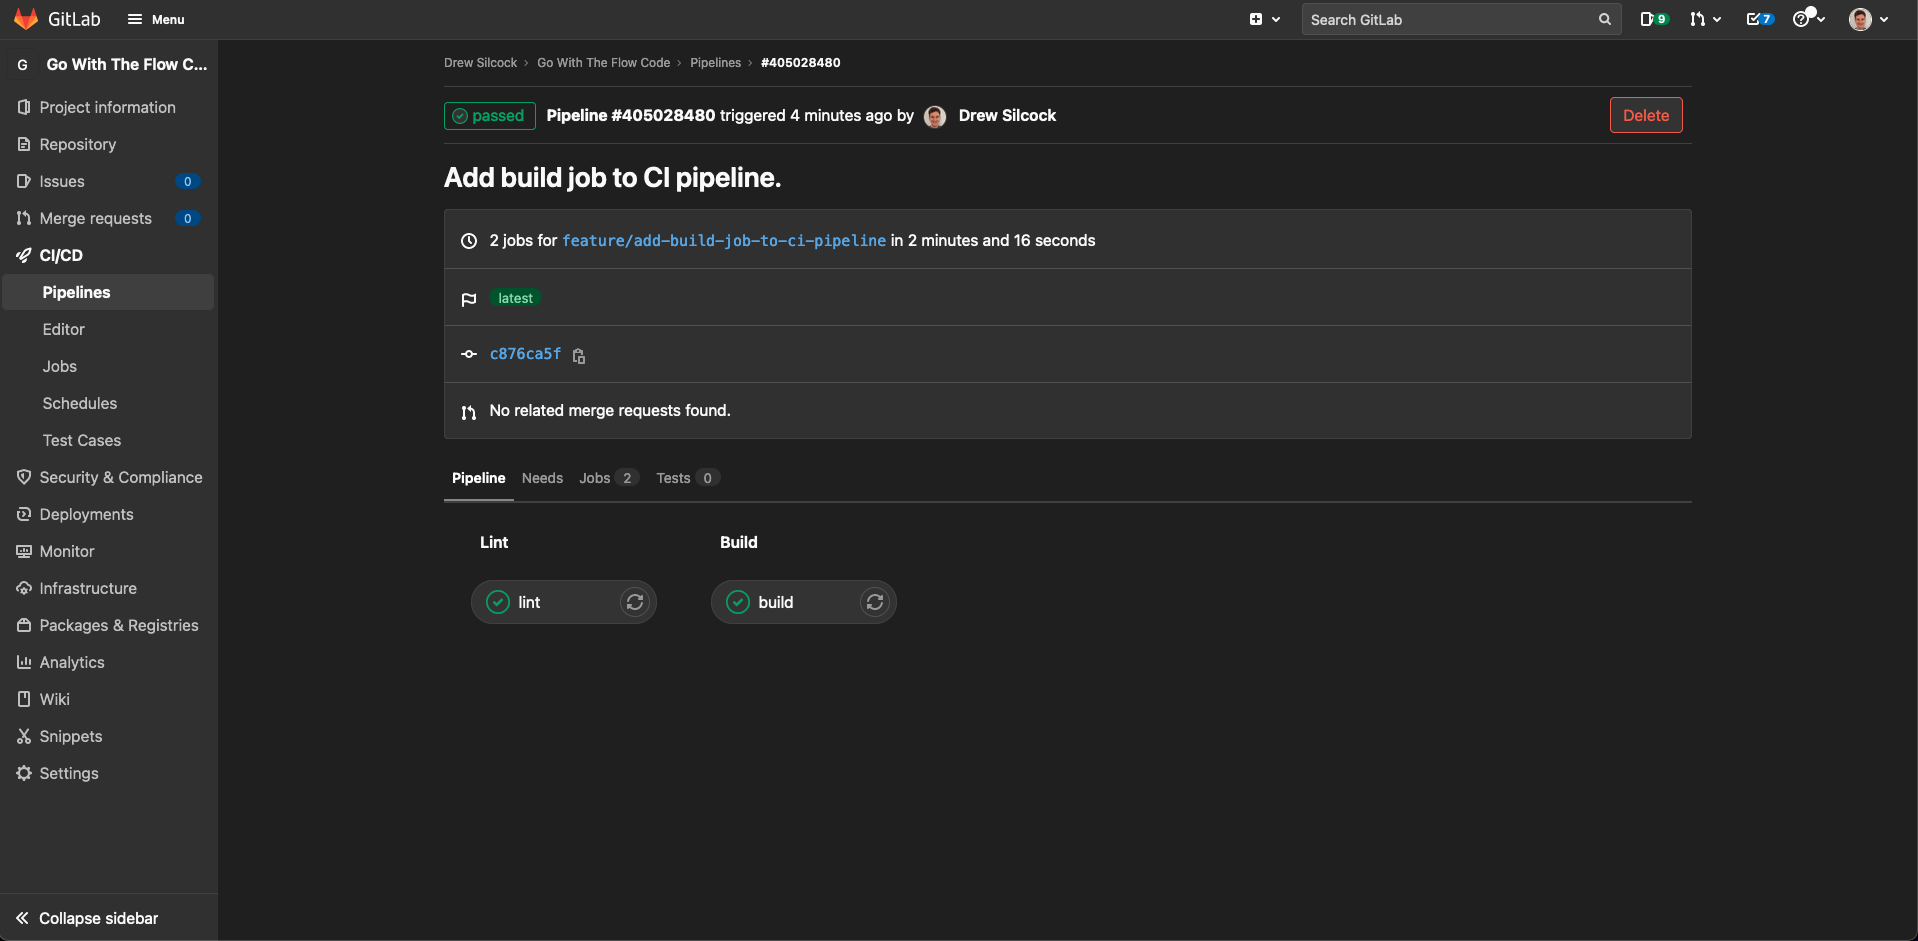
Let’s start by adding another stage to our pipeline to build our code. This’ll happen just after our ‘lint’ stage:
.gitlab-ci.yml
1 2 3 4 5 6 7 8 9 10 11 12 13 14 15 16 17 18 19 20 21 22 23 24 25 26 27 28 29 30 31 32 33 34 | |
Let’s commit and push this up to another feature branch:
git checkout dev
git pull --rebase
git checkout -b feature/add-build-job-to-ci-pipeline

git add .
git commit -m "Add build job to CI pipeline."
git push --set-upstream origin feature/add-build-job-to-ci-pipeline
Now we can see our CI pipeline has an extra stage in it for our build, which as expected is succeeding:
We can do better than this though - we can ‘artifact’ the output of the build so that we have a downloadable history of the state of the built application after every single commit.
This is super useful for regressing bugs because you can run the application after every single commit and find which commit introduced the bug.
First, remember to merge your Merge Request in GitLab (or using command line). Then, here’s how we artifact our built application:
.gitlab-ci.yml
1 2 3 4 5 6 7 8 9 10 11 12 13 14 15 16 17 18 19 20 21 22 23 24 25 26 27 28 29 30 31 32 33 34 35 36 37 38 39 | |
Tip
GitLab CI also supports natively displaying the results of unit tests. If you’re testing your software (which is almost always a really good idea) then you can use this same artifact to collect unit testing reports.
These unit tests will also be shown in merge requests so that you can check over them before merging feature or fixes into your dev branch.
Now if you commit and push this up:
git checkout dev
git pull --rebase
git checkout -b feature/artifact-built-ci-executables

git add .
git commit -m "Add artifacting of built executables to CI build job."
git push --set-upstream origin feature/artifact-built-ci-executables
Now if you go to the “CI / CD” > “Pipelines” page, you should have a dropdown allowing you to download your built application executable as a file called artifacts.zip - decompress this and you’ll get your hbaas-server exe for that commit (it’s a Linux ELF binary, so it will only run on Linux systems). Go ahead and merge that feature branch once it passes.
Success
With this completed, you’ve now got your continuous integration pipeline set up! Congratulations!
In the next chapter we’re going to use this pipeline and extend it to deploying our applications as well as just building them.
-
A case in point here is that GitHub Actions configuration files changed entirely from using a domain-specific language (DSL) to using YAML (like all the other CI solutions), which means searching around for documentation still brings up the old DSL solution instead of the new YAML solution. This isn’t such a bug issue anymore as online memory of the old DSL fades, but it still pops up now and then. ↩