5.  Setting up continuous deployment
We’ve done some really cool things with our git-flow, semantic versioning and continuous integration, but I’m sure you’re wondering when we’re going to actually put this API up for people to use.
Well, fear not, because this last section is going to talk you through extending our existing CI pipeline to add continuous deployment!
Recap: why continuously deploy?
There’s a bunch of major advantages to continuous deploying your software:
- You don’t need to worry about having a dev environment set up the right way with the right software and library versions because it’s entirely pre-specified by the CD pipeline.
- It encourages you to do lots of small updates to your app, instead of leaving your deployment for months and having every deploy be a major task. This encourages rapid iteration and makes rolling back a breeze (especially with GitLab CI).
- You can extend your pipeline to automate more advanced workflows, like deploying a whole new version of your cloud environment for a release candidate, or for new features.
- It’s repeatable and less error-prone - by taking away the human element in the deployment process, you ensure that every deployment runs exactly the same. There’s no possibility of accidentally deploying to the wrong instance or running commands in the wrong order or any of that. If your deployment works the 1st time, it should be the 1000th time.
Let’s publish our images automatically
Now that we’ve got lint and build stages set up, we can build and upload our image to the private repository we created in Section 3.
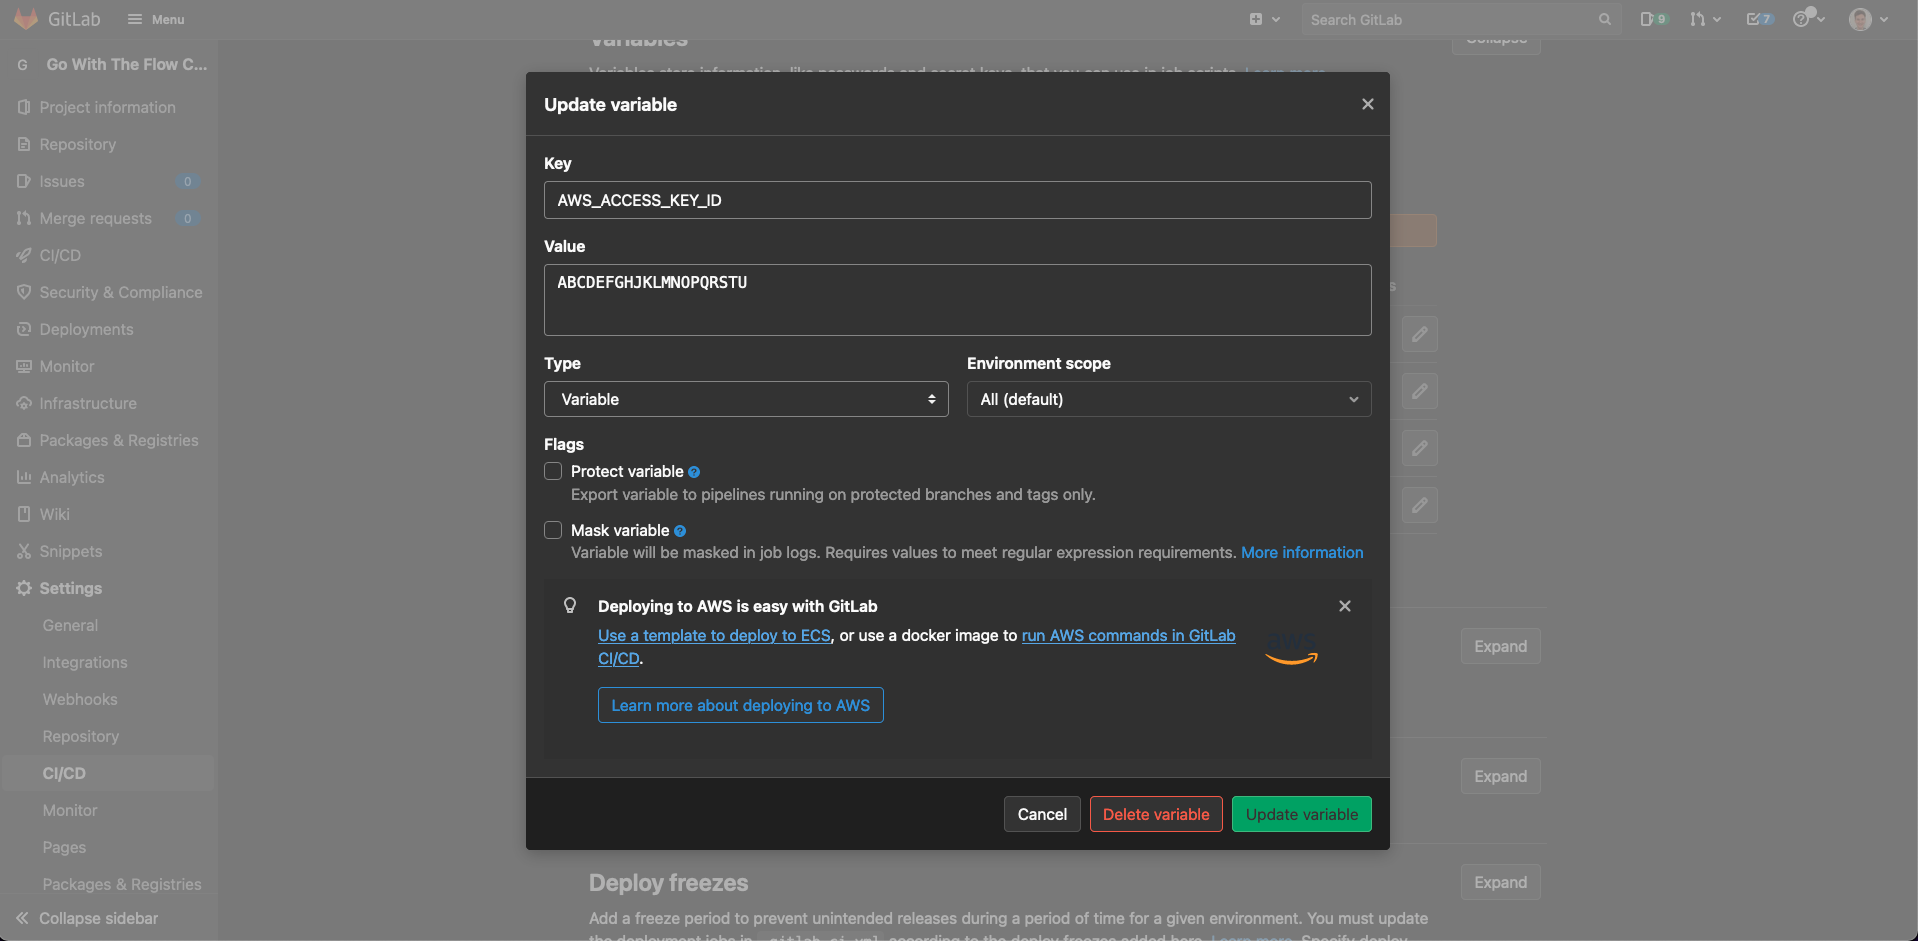
As we need to have access to our private ECR repository, we need to put our AWS access key and secret key into GitLab’s project CI settings. This allows us to retrieve these values from a CI job so that we can login to the Docker repository and push the our image.
We need to copy these values and our region into the “Variables” section under “Settings” > “CI / CD”. The variables we need to add are:
AWS_ACCESS_KEY_ID- the access key for your AWS accountAWS_SECRET_ACCESS_KEY- the secret key for your AWS accountAWS_DEFAULT_REGION- the region that we’re using (i.e.eu-west-2)
Note
If you’re using an older hosted version of GitLab, this UI will look slightly different, and the section will be called “Secrets” instead of “Variables” - the outcome is the same, though!
Warning
Make sure you untick the “Protect variable” checkbox for all of these variables - on the publicly hosted GitLab this is enabled by default by this means we’d have to protect our main, dev and version tag branches. If you don’t, our CI pipelines won’t be able to access the variables and so won’t be able to authenticate against our ECR repository.
In general this is a really good idea to do because it protects your AWS credentials and also prevents accidental git history rewrites, but we’re trying to keep it simple here.
Info
In a production environment, you’d want to use Amazon IAM to create a set of credentials specifically to put into GitLab CI. You can then restrict the permissions granted to these credentials to only push to ECR. That way, if your AWS credentials are ever leaked from GitLab, any malicious people won’t be able to mess up your AWS infrastructure.
Once you’ve done this, we can update our GitLab CI YAML to add an extra stage for our Docker deployment and add a job that will upload a Docker image every time a commit is pushed to the dev branch or when a tag is created:
.gitlab-ci.yml
1 2 3 4 5 6 7 8 9 10 11 12 13 14 15 16 17 18 19 20 21 22 23 24 25 26 27 28 29 30 31 32 33 34 35 36 37 38 39 40 41 42 43 44 45 46 47 48 49 50 51 52 53 54 55 56 57 58 59 60 61 62 63 64 65 66 67 68 69 70 71 72 73 74 75 76 77 78 | |
Note
You might notice that we had to use the docker:19.03.12 image for the upload job, and docker:19.03.12-dind and add a few global variables to the pipeline.
This is because we need to be able to use Docker from inside the job, which is itself running in a Docker image. We need to allow the Docker in the job inside the container to contact the Docker daemon running outside the container. This is known as dind or Docker-in-Docker.
Info
This setup will run the production deployment whenever a tag is uploaded. This means that you can only use tags for version releases.
Sometimes you might need to use tags for other purposes as well - this is fine! You just need to modify the only block to do one or multiple of the following:
- Only run when tag matches semantic version, e.g.
v1.2.3,v1.2.3-abc(this is what I’d recommend1) - Only run when tag in on master branch (this has important caveats to consider2)
For more info on how to set this up, check out: conjunction logic for GitLab CI job condition.
Let’s go ahead and commit this:
git checkout dev
git pull --rebase
git checkout -b feature/add-docker-image-publishing-to-ci

git add .
git commit -m "Add CI job to upload Docker image to ECR."
git push --set-upstream origin feature/add-docker-image-publishing-to-ci
You’ll need to merge this one before you can see the publish job running. Once you do, it should look like this:
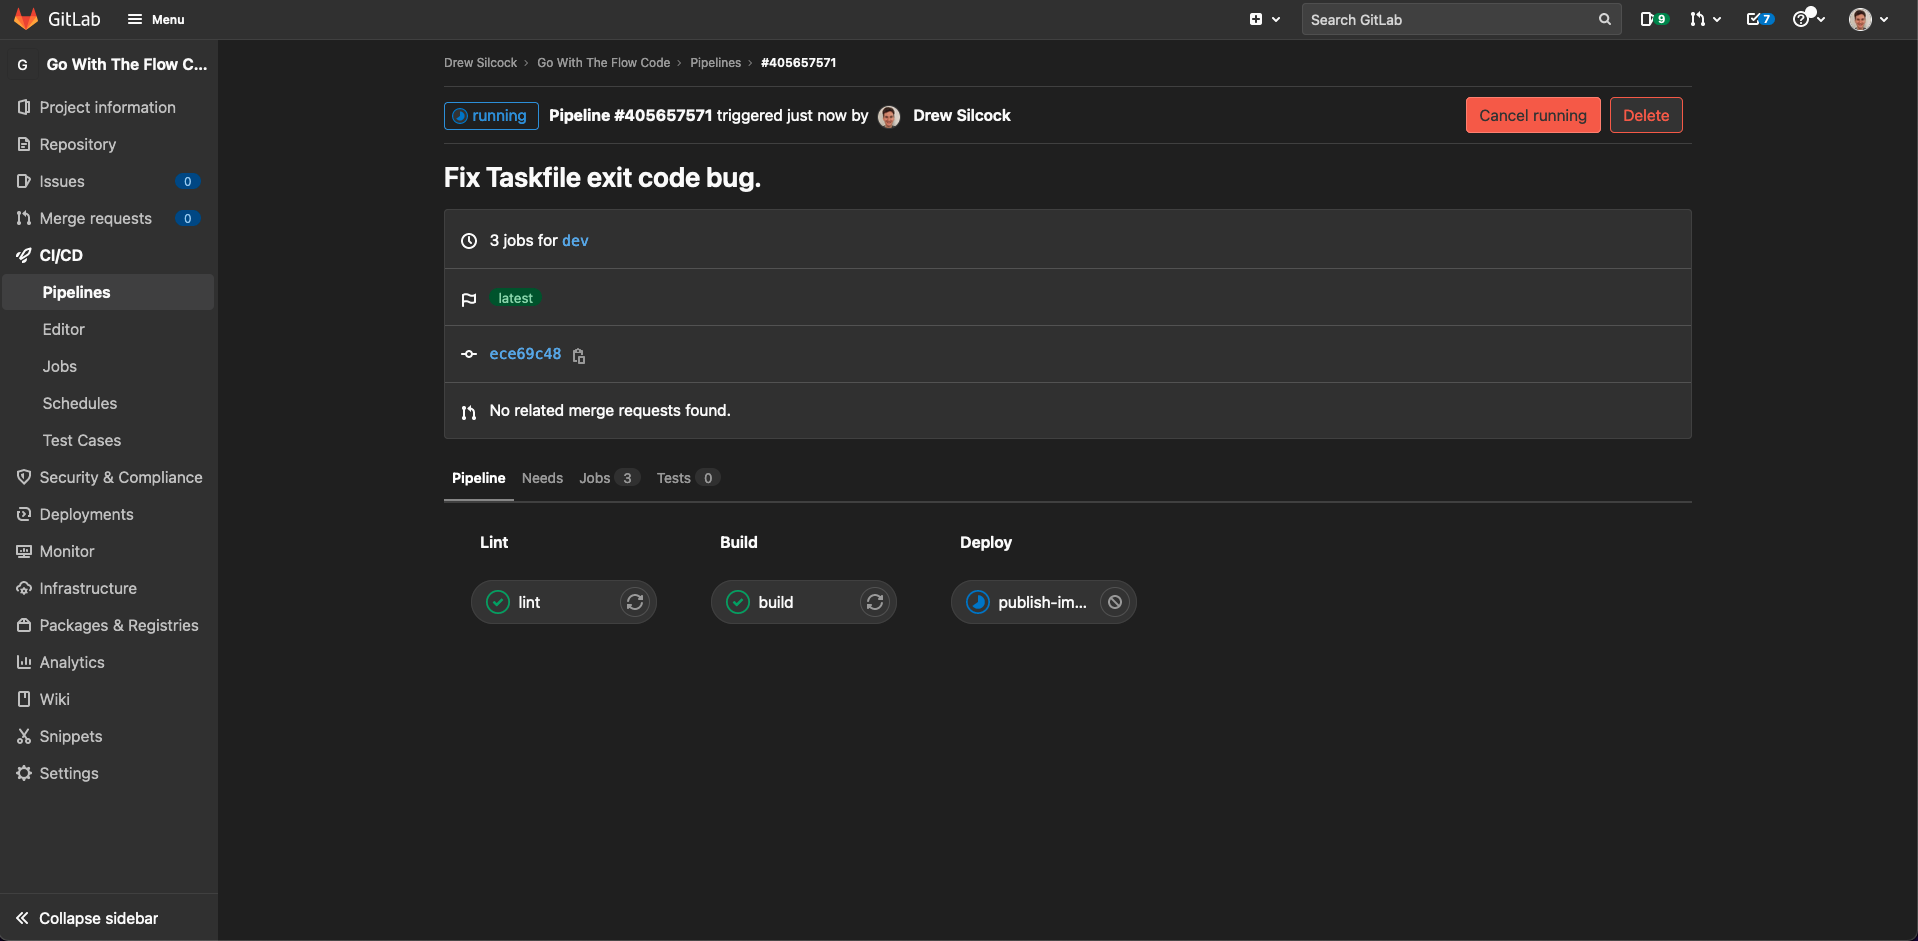
This upload job will run either on the dev branch or on any tags that are created, which in our workflow correspond to version releases.
Note
Building images for your feature and bug fix branches can be a really powerful and useful tool to use in combination with continuous deployment for allowing you to automatically host test environments for new features so that QA engineers can verify that they’re working correctly.
This would be part of a much more complex and sophisticated CI / CD setup, so isn’t in scope of this tutorial.
If you check your “publish-image-dev” job in GitLab, you should see an output that looks something like this:

You can check to make sure that your images have uploaded properly by running:
aws ecr describe-images --repository-name go-with-the-flow/hbaas-server-<your-name> | jq
{
    "imageDetails": [
        {
            "registryId": "049839538904",
            "repositoryName": "go-with-the-flow/hbaas-server-drewsilcock",
            "imageDigest": "sha256:3a788d1cdaf64346d6d94f7a3519b38bd7a44399d727726b4330c5d421f1a480",
            "imageTags": [
              "latest",
              "dev",
              "v1.0.0-160786e"
            ],
            "imageSizeInBytes": 12110909,
            "imagePushedAt": "2021-11-09T09:41:35+00:00",
            "imageManifestMediaType": "application/vnd.docker.distribution.manifest.v2+json",
            "artifactMediaType": "application/vnd.docker.container.image.v1+json"
        },
        {
            "registryId": "049839538904",
            "repositoryName": "go-with-the-flow/hbaas-server-<your-name>",
            "imageDigest": "sha256:c29a539f33ac40ac65a053d75c1f6ae6e75440c14c4f8e2a0d231f612b1b5166",
            "imageTags": [
                "v1.0.0-af6f40d"
            ],
            "imageSizeInBytes": 12110280,
            "imagePushedAt": "2021-11-07T20:32:42+00:00",
            "imageManifestMediaType": "application/vnd.docker.distribution.manifest.v2+json",
            "artifactMediaType": "application/vnd.docker.container.image.v1+json"
        }
    ]
}
Note
You’ll notice that your new uploaded image has the latest tag and the image you uplaoded manually in the last section no longer does. When you upload a new image with a particular tag, e.g. latest, it will take the place of any existing image with that tag. This means that you always get the most up to date image when you pull the latest tag.
Hosting our API with Docker Compose
If you were creating a full production cloud architecture, you’d probably want to take our image that we’re automatically building and publishing and run it using one of Amazon’s many services for such things, such as Amazon ECS (Elastic Container Service) or Amazon EKS (Elastic Kubernetes Service). As these are very complicated tools that require significant AWS expertise and engineering to set up correctly, that’s outside of the scope of this time-limited tutorial.
Instead, we’re going to set up a simple, single-machine hosting setup using Docker Compose.
If you haven’t used it before, Docker Compose is a simple tool for running multiple Docker containers together - they can communicate with each other, share volumes and have ports exposed as external services - all configured through simple YAML files. (Yes more YAML! Just be glad we’re not touching Kubernetes, or we’d be drowning in YAML.)
Let’s go ahead and create our docker-compose.yaml and add our development and production images to it:
docker-compose.yaml
1 2 3 4 5 6 7 8 9 | |
We do need to install the docker-compose command line tool which is just two commands:
sudo curl -L "https://github.com/docker/compose/releases/download/1.29.2/docker-compose-$(uname -s)-$(uname -m)" -o /usr/local/bin/docker-compose
sudo chmod +x /usr/local/bin/docker-compose
Note
You may need to re-login to the ECR if it’s been a while since you did the docker push from Section 3:
aws ecr get-login-password | docker login --username AWS --password-stdin 049839538904.dkr.ecr.eu-west-2.amazonaws.com
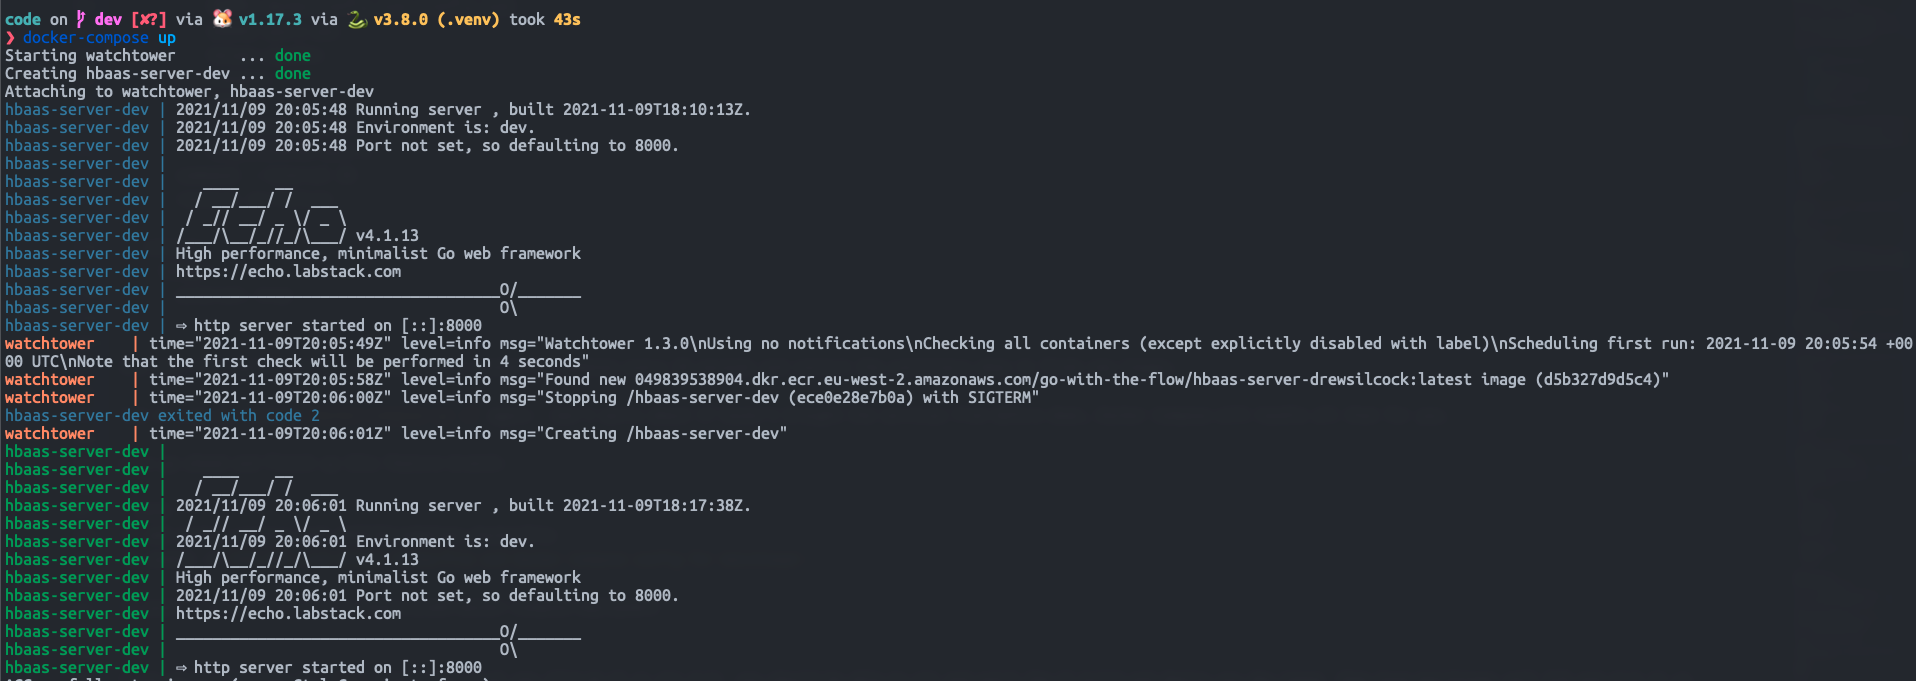
Now if we run docker-compose up we’ll see the dev version of the API spin up. To spin the service up in the background, we can use the -d flag:
docker-compose up -d
We can still check out the logs by running docker-compose logs -f, but now we can get on with doing other things in our shell.
Notice how we added restart: on-failure to the containers - this means that if any errors occur with our API, Docker Compose will automatically restart them for us. This ensures availability and reliability of our API.
Let’s branch commit our progress before continuing:
git checkout dev
git pull --rebase
git checkout -b feature/add-docker-compose-deployment

git add docker-compose.yaml
git commit -m "Add Docker Compose deployment YAML file for dev and prod API."
# We're going to do a bit more work on this Docker Compose file so we'll push it up to
# GitLab in a bit.
Setting up automatic re-deployment
So we’ve got our Docker images being continuously published up to ECR and we’ve got dev and prod APIs running through Docker Compose, but if we update our API images, our deployments currently don’t update.
There’s a couple of different ways to fix this:
- Add SSH keys to the GitLab CI/CD pipeline and manually update the tags on the
docker-compose.yamlover SSH inside the GitLab CI/CD pipeline. - Set up a “watcher” on the Docker Compose side that polls ECR for updates to the tags, then pulls them in and restarts the APIs when it finds updates to the images.
We’re going to set up the latter because it’s simpler and more reliable, plus you don’t need to worry about having your private SSH keys leaked via GitLab.
There’s a tool we can use for this called Watchtower - this will handle all of the polling, image version checking and restarting for us.
In order to get Watchtower to play nicely with ECR, we need to do a couple of extra steps. We’re going to use the amazon-ecr-credential-helper tool to allow Watchtower to pull the images from our private ECR repository. First things first, we need to create a Dockerfile for this credential helper. Let’s create a file called AWSECRCredHelper-Dockerfile:
AWSECRCredHelper-Dockerfile
1 2 3 4 5 6 7 8 9 10 11 12 13 14 | |
This is adapted from a guide on the Watchtower documentation.
What we want to do here is build the docker-credential-ecr-login binary from this AWSECRCredHelper-Dockerfile and make it available to the Watchtower container from our Docker Compose via a volume. To do this, we need to create the volume and build the binary:
docker volume create helper
docker build -t aws-ecr-dock-cred-helper -f AWSECRCredHelper-Dockerfile .
docker run -d --rm --name aws-cred-helper \
  --volume helper:/go/bin aws-ecr-dock-cred-helper
If this all goes well, we should now have a volume called helper which contains the ECR credential helper built binary.
We’re going to use the Amazon ECR credential helper tool that we did before, but this time in a containerised way. Make sure you’ve got your JSON config file set up at ~/.docker/config.json as per Section 3.
If you correctly set up your AWS CLI in Section 0 then you should already have a folder called ~/.aws with your AWS credentials in it. All we need to do is mount that inside our Watchtower container along with the helper volume we created and the Docker socket for Docker-in-Docker to work, like so:
docker-compose.yaml
1 2 3 4 5 6 7 8 9 10 11 12 13 14 15 16 17 18 19 20 21 22 23 24 25 26 27 28 | |
This will tell Watchtower to poll the Docker socket for updates every 30 seconds and restart the containers when it finds new images.
Give it a go by running docker-compose up -d again - don’t worry about if haven’t brought the services from before down, Docker Compose will handle all that for you.
Let’s go ahead and finish up this feature branch:
git add docker-compose.yaml AWSECRCredHelper-Dockerfile
git commit -m "Add AWS cred helper Dockerfile and Docker Compose config for Watchtower."

git push --set-upstream origin feature/add-docker-compose-deployment
If you merge this into the dev branch the usual way (GitLab UI or git CLI), you should be able to sit and watch the CI build and deploy you dev image, then have Watchtower poll ECR and pick it up. Watchtower will then automatically restarts your dev service - neat!
Triggering our deployments
Now that we’ve got dev API instance continuously deploying, let’s try out adding a new feature so that we can do a version bump and see our CD pipeline in action!
Firsly, let’s add another endoint that’ll work as a health check for our API:
handlers/maintenance.go
1 2 3 4 5 6 7 8 9 10 11 12 13 14 15 16 17 18 19 20 21 22 23 24 25 26 27 28 29 30 31 32 33 34 35 36 37 38 39 40 | |
Exercise 5.1
Great, now your final exercise is to create a new branch from the dev branch called feature/add-status-endpoint. Commit your changes and push your feature branch up to GitLab to a branch of the same name. Once you’ve done that, merge the feature branch into the dev branch.
Answers 5.1 - click to reveal
As per usual, all you need to do is run:
git checkout dev
git checkout -b feature/add-status-endpoint
git add handlers/maintenance.go
git commit -m "Add status endpoint that acts as health check."
git push --set-upstream origin feature/add-status-endpoint
And merge using the GitLab UI (or git CLI).
Once that’s done, we can check that it’s properly deployed the dev app by hitting our new status endpoint:
# Remember to change this endpoint depending on your route in your `manifest.yaml`.
curl -s localhost:8000/status | jq
{
  "message": "The time is 41 minutes past the 11 hour on the Tuesday 9 November 2021 and all is well."
}
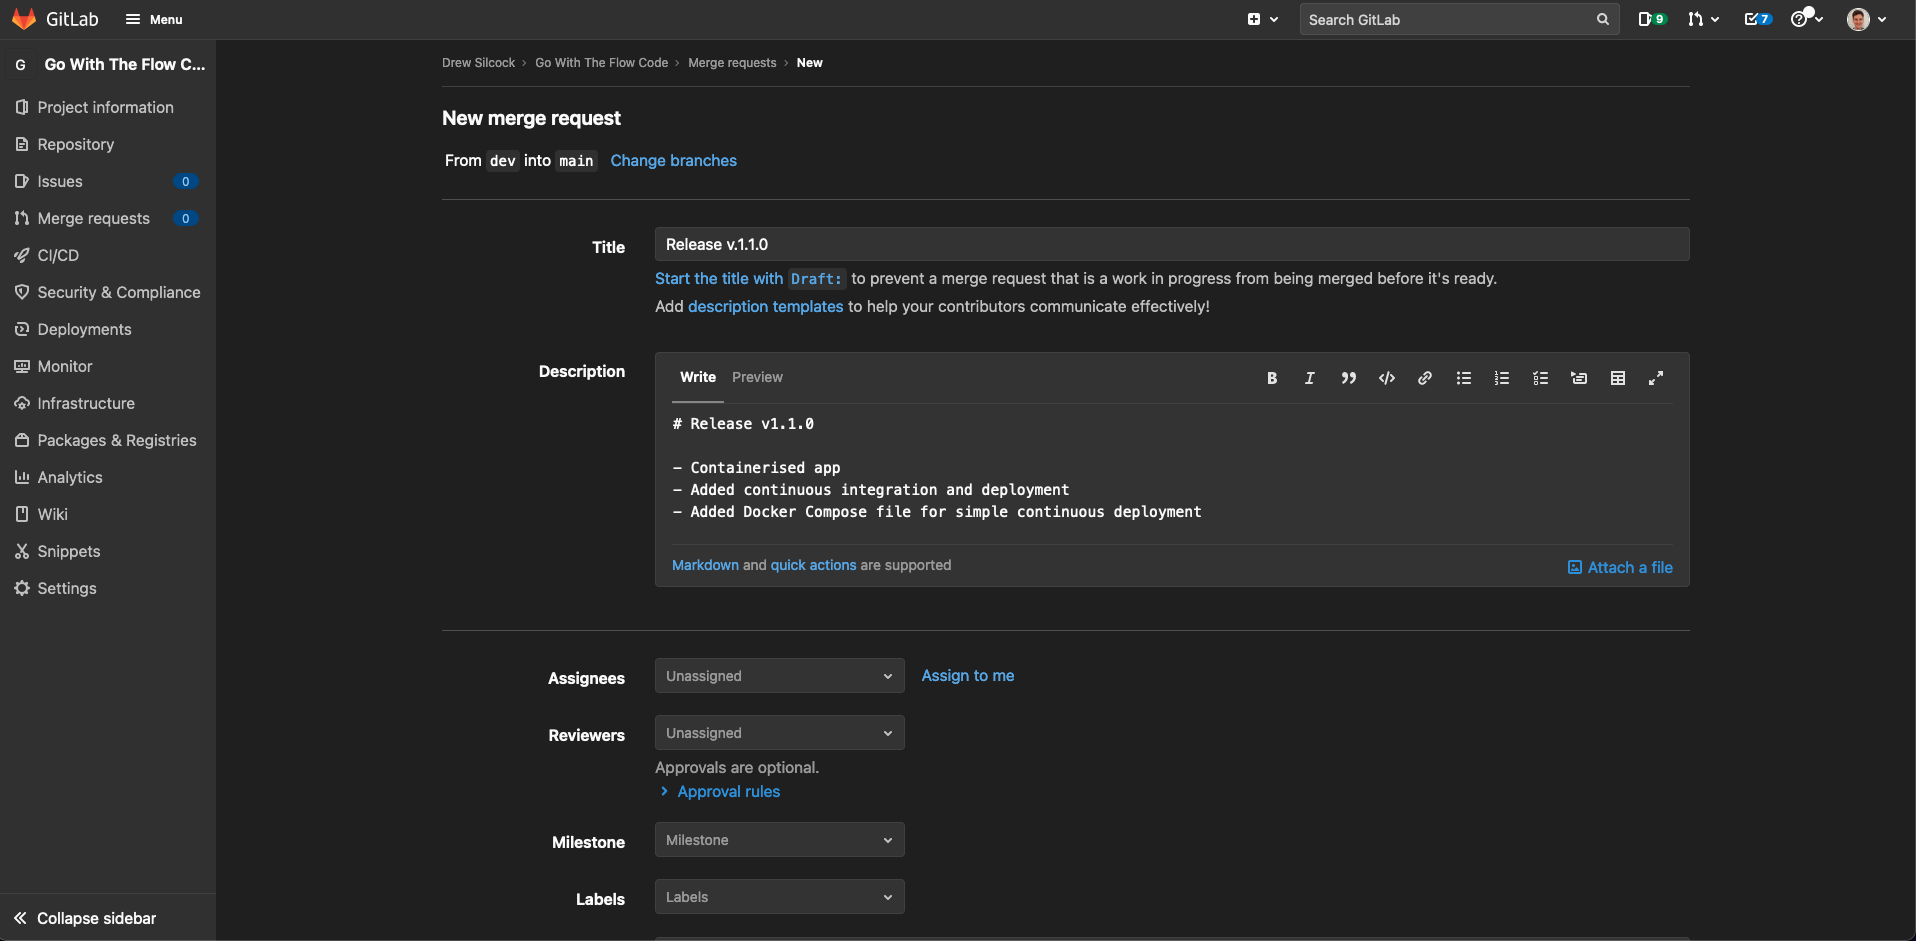
Great! Now let’s do a release onto main so that our prod instance updates. If you’re working on a major update, it’s a good idea to create a dedicated branch for the release candidate, but as we’re only adding a small new feature, we can just merge straight from dev to main.
To do this, let’s create another merge request, this time from dev to main, and call is “Release v1.1.0”:
Note
As we’ve containerised our app and added a new endpoint, we’ve made backwards-compatible but significant modification of the API, hence we do a the minor version bump.
Once that’s created, make sure the CI tests pass and then merge it in!
Warning
Make sure that you’ve got the “Delete source branch” unticked in the merge request on GitLab! You don’t want the merge to get rid of our dev branch.
Creating releases
Once that’s done, all we need to do is create our new version tag on master and push it up and that’ll trigger our prod deployment.
There are two ways to do this. There’s the good ol’ fashioned command-line way and the fancy GitLab UI way.
The good ol’ fashioned command-line way
git checkout main
git pull --rebase
git tag -a "v1.1.0" -m "Release v1.1.0: add status endpoint"
git push --tags
Simple and easy.
The fancy GitLab UI way
There’s another option though - GitLab provides a nice UI for creating new tags which allows you to add “Release notes” which appear under “Releases” in the project overview in GitLab.
Go to “Deployments” > “Releases” in your GitLab project and click “New release”. Here’s the equivalent as above using the fancy GitLab UI:
We can add a small changelog as our release notes in the GitLab UI here which is super useful for looking back at what features were implemented when.
Now sit back and watch as your CD pipeline automatically deploys our updated prod API.
Adding prod to Docker Compose
Once that prod release CD pipeline has finished running, we’ll have our prod image up in ECR. That means we can add our prod container to our Docker Compose:
docker-compose.yaml
1 2 3 4 5 6 7 8 9 10 11 12 13 14 15 16 17 18 19 20 21 22 23 24 25 26 27 28 29 30 31 32 33 34 35 | |
We’ve made the prod version of our API available on port 80 (the standard HTTP port) while the dev version is available on port 8000 - this way we can access both deployment environments while still hosting on our single VM.
We may as well push this up to out GitLab repo as well:
git checkout dev
git pull --rebase
git checkout -b feature/add-hbaas-prod-to-docker-compose
git add docker-compose.yaml
git commit -m "Add HBaaS prod container to Docker Compose."
git push --set-upstream origin feature/add-hbaas-prod-to-docker-compose
Go ahead and merge that and we’re ready to spin the prod version up!
docker-compose up -d
Let’s give it a whirl!
Once that’s done, let’s try it out!
curl -s localhost/version | jq
{
    "build_time": "2020-06-03T10:40:59Z",
    "version": "v1.1.0"
}
{
    "message": "The time is 59 minutes past the 11 hour on the Wednesday 3 June 2020 and all is well."
}
# Just for fun - output will depend on when you run it!
curl -s localhost/date/$(date +"%d-%B") | jq
{
  "message": "Happy birthday to Clint Eastwood!"
}
Success
Congratulations, you’ve successfully set up a full continuous deployment pipeline!
With this done, you can sit back and watch as GitLab CI takes care of all the hard-work when it comes to running and managing multiple deployments. All you need to do is code using this sensible git-flow model and the rest will take care of itself!
-
The way to do this would be to utilise the official semver regex like so:
only:
  refs:
    - tags
  variables:
    # If you don't use a `v` before your semver, just remove the first `v` in this regex.
    - $CI_COMMIT_TAG =~ /^v(0|[1-9]\d*)\.(0|[1-9]\d*)\.(0|[1-9]\d*)(?:-((?:0|[1-9]\d*|\d*[a-zA-Z-][0-9a-zA-Z-]*)(?:\.(?:0|[1-9]\d*|\d*[a-zA-Z-][0-9a-zA-Z-]*))*))?(?:\+([0-9a-zA-Z-]+(?:\.[0-9a-zA-Z-]+)*))?$/
Note that this syntax won’t work on some much older versions of GitLab. ↩
-
Technically, tags and branches are both just pointers to commits. This means that running on tag and master is not reproducible because another commit on the master branch will move the commit that master points to and thus would mean that the tag && master condition no longer applies.
This breaks a pretty important principle of CD which is that you can simply repeat a pipeline and have the exact same thing happen. This reproducibility is what makes rolling back to specific versions so easy.
This is discussed more on the GitLab issue for this topic. ↩